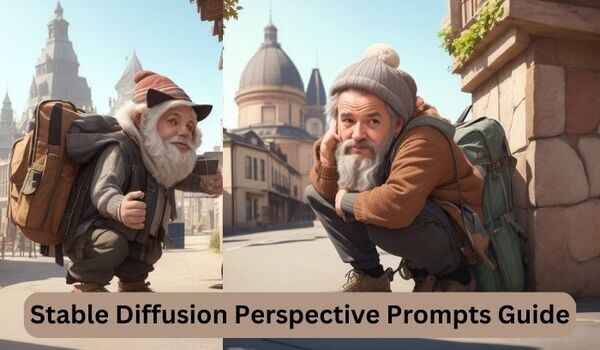
Stable Diffusion Perspective Prompts are a powerful tool to create more creative, expressive, immersive, and informative images, but crafting effective prompts may pose a challenge for some users.
So, in this guide, we’ll break down the difference between Perspective Prompts and general prompts, helping you understand how to use them effectively.
We’ll also provide you with some practical examples to inspire your own creations, as well as techniques refined through our experimentations all in one place.
What are Stable Diffusion Perspective Prompts?
Perspective Prompts for SD are akin to providing instructions to your computer program models, which you’ve installed or hosted on a cloud server, to generate an image based on your description.
You can say that it’s similar to explaining to a friend how to draw something.
General prompts, on the other hand, do not specify a particular perspective.
Instead, they simply describe the subject of the image and leave Stable Diffusion to decide the best way to portray it.

For example, you could say in a general prompt “A landscape with mountains and trees”.
But for a perspective prompt it should be like the below:
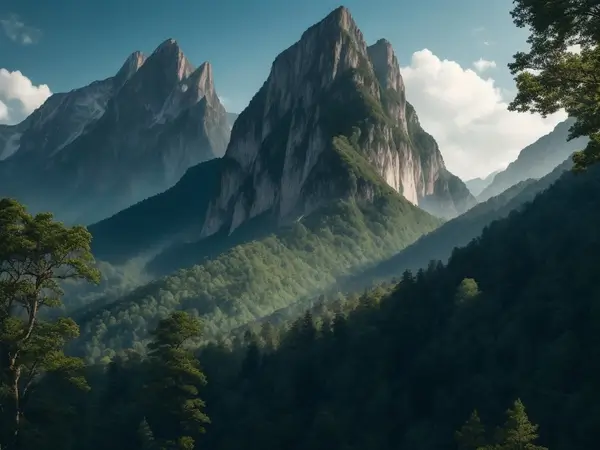
“View the world from the foot of majestic mountains, their peaks soaring high above while being embraced by a lush forest of towering trees, their leaves rustling in the breeze.”
As we’ve grasped the basic distinction between general prompts and perspective prompts, let’s now delve into the structure.
Anatomy of Stable Diffusion Perspective Prompts with Example
A well-constructed perspective prompt is like a carefully drawn map for Stable Diffusion, providing clear directions for creating a vivid image.
Here I will use the DreamShaper V7 model for testing purposes with environmental and animal images. I hope you also know that it can be best for this type of image.
So, let’s explore its fundamental elements,
Vantage Point:
The vantage point is like the camera’s position in a scene.
And the camera’s position can have a significant impact on the perspective, composition, and mood of the photo.
By understanding how camera position can affect an image, you can use it to create more interesting and visually appealing photos.
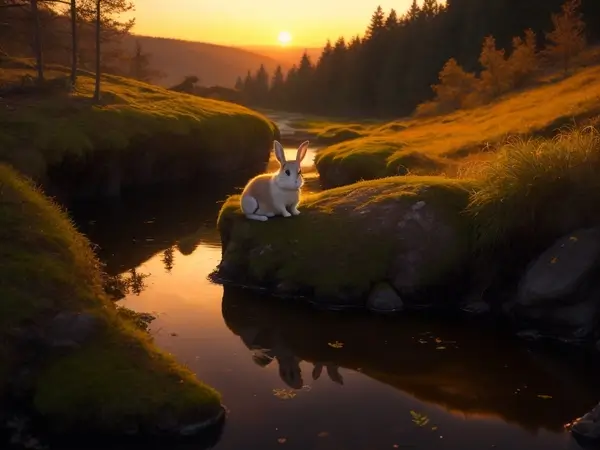
Prompt: “Envision a small rabbit nestled on a bed of soft moss, gazing out at a winding river reflecting the warm hues of a fiery sunset.”
You can see that in the prompt, I set the stage for an image of a rabbit on moss, looking out at a river and a sunset.
I hope you understand how it is meant to help the AI visualize this particular scene.
Here I also use a negative prompt for this image but don’t worry, I discuss it in detail below.
To know more you may read our article on Stable Diffusion camera prompts.
Subject Matter and Setting:
This is the main thing you want to see in the image. It’s the focus, whether it’s a person, a place, an object, or an event.

Prompt: “Show me an old, weathered book resting on a velvet cushion, bathed in the soft light of a vintage desk lamp.”
The subject matter of the prompt is a carefully arranged still-life scene. It features an aged and worn book, symbolizing history or wisdom, placed delicately on a plush velvet cushion.
And the setting is illuminated by the gentle glow of a classic desk lamp, evoking a sense of nostalgia and highlighting the significance of the book.
Atmosphere and Lighting:
This sets the mood by describing how light falls on the scene. It’s about the time of day, weather, and overall feel.
So, let’s craft a perspective prompt that vividly portrays a dense and ancient forest. Describe how the sunlight filters through the thick canopy, creating enchanting patterns on the forest floor.
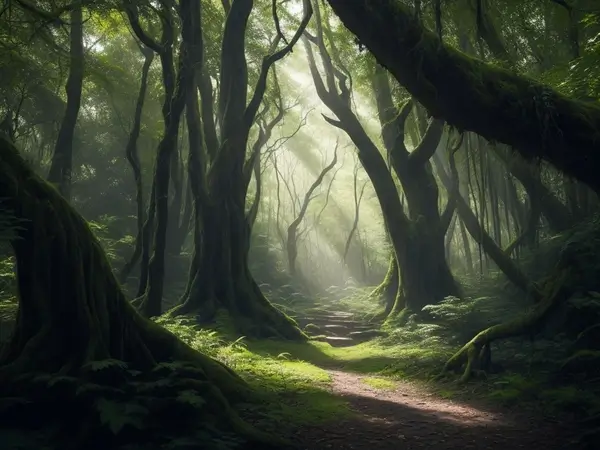
Prompt: “Envision a dense, ancient forest, where dappled sunlight pierces through the thick canopy, casting magical patterns on the forest floor.”
Technical Considerations:
Think about the Stable Diffusion model you are using, as different models have specific strengths and weaknesses.
In my case, using the DreamShaper v7, is better for realistic, anime, and artistic images, while others may be better suited for abstract creations and other styles.

Prompt: “View the world through the determined eyes of Izuku Midoriya, the young hero from My Hero Academia, as he stands tall in his iconic green costume, ready to face any challenge that comes his way.”
So, try to specify a character or a particular scene for better results. As you can see, I have used Izuku Midoriya, a well-known character from the anime series “My Hero Academia.”
Emotions and Feelings:
These bring depth to the image. They’re about the feelings the image should provoke in the viewer.
So, let inspiration from the previous one and make a perspective prompt that evokes a sense of nostalgia, with warm colors and familiar objects from childhood.
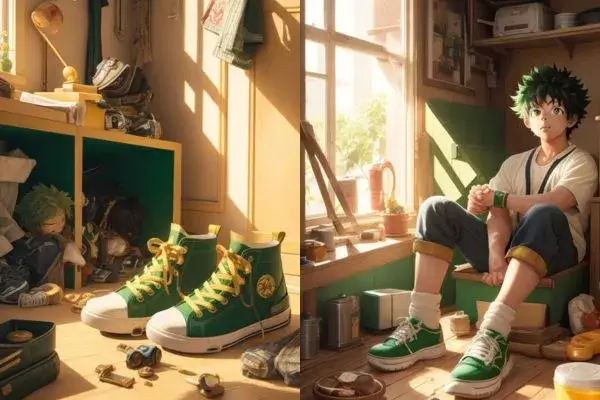
Prompt: “Step into Izuku Midoriya’s shoes, feel a rush of nostalgia amidst familiar childhood objects, bathed in warm, golden hues.”
Balance and Composition:
This is about how everything in the image fits together. It’s like arranging elements in a painting or a photograph to create a pleasing whole.
Now let’s create a prompt that demonstrates balance and composition through careful arrangement of elements within an imagined scene.
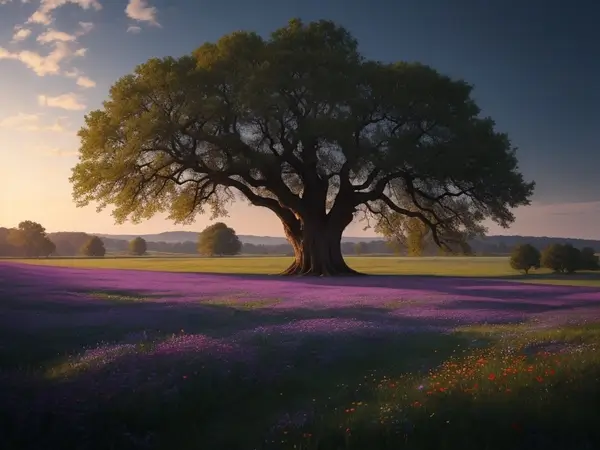
Prompt: “Imagine an open field dotted with vibrant wildflowers, leading the eye toward a solitary, ancient oak tree, standing tall against the horizon.”
So, finally, I want to say when crafting a perspective prompt, you’re essentially painting a mental picture for Stable Diffusion to bring to life.
And I hope these considerations help you guide the system toward creating an image that matches your vision.
You May Like To Try The New Talkie Soulful AI
Now, it’s time for negative prompts. As I promised earlier in the article, I will discuss negative prompts and how to use them in perspective prompts.
Negative Prompts on Perspective Prompts:

Effect of Negative Prompts on Perspective Prompts:
Negative prompts can have a significant impact on the outcome of an image generated from a perspective prompt. They can result in:
1. Confusion: Unclear or contradictory Negative prompts may lead to confusion for the SD model, making it difficult to understand what you actually want.
2. Misinterpretation: The model might focus on avoiding the negative aspect rather than understanding the positive elements you want in the image.
So, choose a suitable model based on your preferences.
Otherwise, it can lead to an image that lacks coherence or relevance.
To avoid the issues related to negative prompts, you can do the following:
Overcoming the Effect of Negative Prompts:
1. Be Clear and Specific: Ensure your negative prompt is clear and specific. Instead of saying “Not a rainy day,” you could say “A sunny day with clear skies.”
2. Use Positive Language: Frame your prompts in a positive manner to express what you want, rather than what you don’t want.
For example, say “Show a cheerful garden” instead of “Not a gloomy garden.”
3. Provide Context: Offer additional context or details to clarify your intent. This can help the model understand the scene you’re envisioning.
4. Experiment and Iterate: Finally, if you find a negative prompt isn’t working, try rephrasing it or using a positive prompt instead.
Experimenting with different approaches can lead to better results.
Now let’s balance negative prompts with positive ones because it is crucial for effectively conveying your vision.
Here’s a detailed explanation with examples:
1. Positive Emphasis: Start with a positive prompt that highlights the key elements you want in the scene. This sets the foundation for the image generation process.
Example: “Create a vibrant beach scene with colorful umbrellas and people enjoying the sun.”
This clearly establishes the desired elements in the scene.
2. Negative Clarification: Follow up with a negative prompt to provide specific clarifications or exclusions to refine the details and help avoid any unwanted elements.
Example: “storm clouds in the sky.”
This negative prompt ensures that the sky remains clear, aligning with the desired atmosphere.
By employing this balanced approach, you provide the AI with clear instructions while also eliminating potential misunderstandings.
This actually ensures that the system comprehends your vision and generates an image that closely aligns with your desired perspective.
Now, If you need a guide, refer to our SDXL negative prompt guide.
I hope you’ve gained an understanding of perspective prompts and are now prepared to create your own Stable Diffusion Perspective Prompts.
If there’s anything missing, please let me know by commenting below.

Hi there! I’m Zaro, the passionate mind behind aienthusiastic.com. With a background in Electronics Science, I’ve had the privilege of delving deep into AI and ML. And this blog is my platform to share my enthusiasm with you.