Face swapping in stable diffusion allows us to seamlessly replace faces in images, creating amusing and sometimes surreal results.
But we may be confused about which face-swapping method is the best for us to add a layer of enjoyment to visual storytelling.
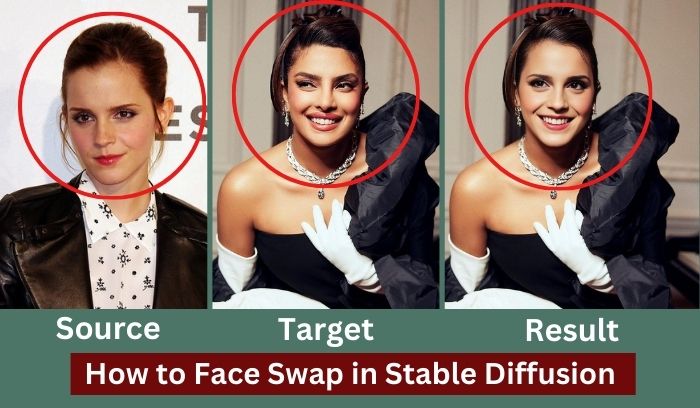
That’s why In this post, I will guide you on how to face swap in stable diffusion with ReActor and Roop extensions.
And give our final verdict on which Stable Diffusion face swap extensions should you use and why.
How to Install ReActor and Roop in Stable Diffusion
First, let’s walk through the step-by-step process of installing and setting up ReActor and Roop extensions in Stable Diffusion.
For AUTOMATIC1111 Web-UI Users:
After launching the Stable Diffusion Web UI, navigate to the “Extensions” tab.
For ReActor: Load “Available” extensions and either type “ReActor” in the search field or use [this URL](https://github.com/Gourieff/sd-webui-reactor) in the “Install from URL” tab.
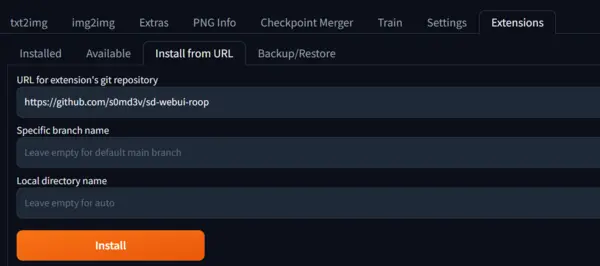
For Roop: Load “Available” extensions and either type “Roop” in the search field or use [this URL](https://github.com/s0md3v/sd-webui-roop) in the “Install from URL” tab.
Now, Click “Install” and patiently wait for the installation process to complete.
Once you encounter the following message,

Now, smoothly restart the UI from the “Installed” tab.

In this way, you can successfully install ReActor and Roop in Stable Diffusion.
If you encounter a ‘NoneType’ object in the Roop installation with no attribute ‘get’ error, download the inswapper_128.onnx model and put it inside <webui_dir>/models/roop/ directory.
For help with ReActor installation issues, you can visit the GitHub repository.
Now, let’s explore the innovative features these extensions have to offer.
How to Face Swap in Stable Diffusion with ReActor
After successfully installing the ReActor, we have two best options: Text to Image, and Image to Image.
But before testing do the following settings:
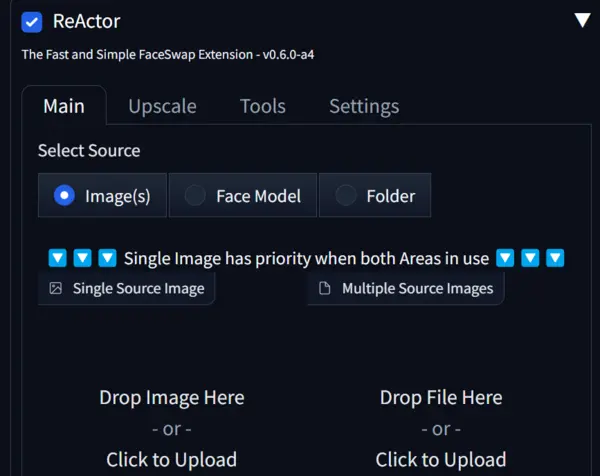
First, enable the ReActor by clicking the check box and keep all things by default because we will change as you need later.
But let me now clear all the options:

Source Image: the image whose face is swapped in your target image or text to image generation.
Gender detection(Source): It will help the model to understand your source image.
Gender detection(Target/Result): It will indicate what gender image are you going to generate.
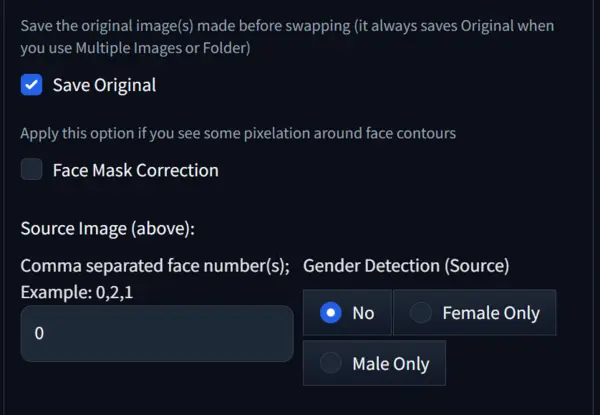
Save original: Whether you want to save the original image or not alongside the generated image.
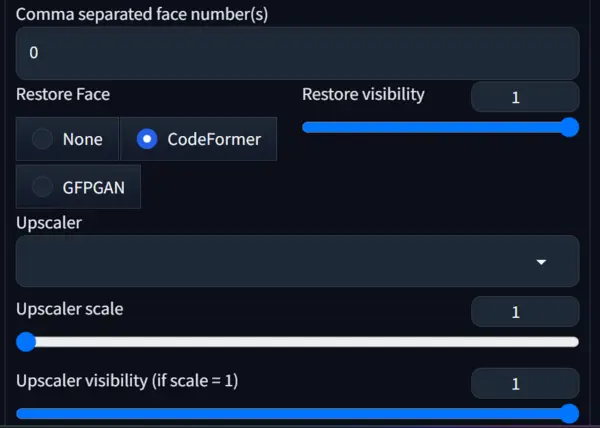
CodeFormer Weight: CodeFormer weight determines the extent to which the CodeFormer effect is visible on the target image.
Restore Face Visibility: It defines how a source image impacts the target image, its highest value is 1 and it is best to go.
Now, let’s test:
Text to Image:
Prompt: A beautiful woman, professional, realistic, well dressed.
Negative Prompt: Unrealistic, cartoon, anime, low quality, cropped, bad quality.
Model: Realistic Vision v1.5
Sampler: Euler_a
Steps: 20
Size: 512*512
The generated image without face swapping is:

I have compressed image quality to reduce my website load, so it seems a little low quality, but our target is face swapping, so it’s okay.
Now, l upload the source image and hit the generate button, for better results, I am selecting ‘female’ in the gender detection section.


You can how the vibe of the smile and face matched with the source image.
I have edited in prompts a little bit while swapping to focus on the face.
The edited prompt is: “A beautiful woman, realistic.”
Now, let’s move to the fun part of the ‘text to image’ swapping with ReActor, you can also test in the ‘image to image’ section.
Multiple Face Swapping:
For this test first generate an image with a prompt, for my case the prompt: “Two beautiful women, professional, well dressed.”
The source image and other settings remain the same and hit the generate button.

If you closely notice the faces in the image are like the source image, mentioned and shown just above this image.
To do multiple face swaps you should keep remembering some basic things, first, see the below screenshot.
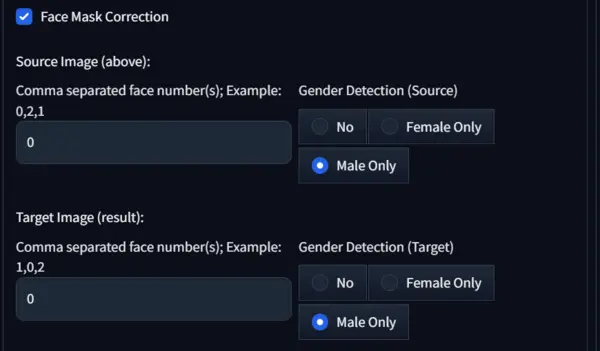
Here just below the ‘face musk correction’ you can see the numbers 0,2,1 and 1,0,2.
If you upload one image then put 0 in the source image box, for two faces put 0,2, and so on.
Now, for face swapping put 1 for one face and two faces 1,0, in my case as there are two faces I have put 1,0.
If you skip the settings, the model by default swap only one face.
Image to Image:
To do this click on the image to image tab and upload your target image. Then set the gender detection and select your model.
In my case, all the settings remain the same, and the target image is:
Now, hit the generate button, and wait for the magic of swapping:

Wow! The model is the same but the face and cuteness of the face are hired from the source image.
You can check it, just by scrolling a little bit of the page.
That’s all about face-swapping with ReActor, now let’s move to explore the Roop extension and check which one is better.
Also Read: How to control lighting in stable diffusion
Face Swapping in Stable Diffusion with Roop
First, as usual, enable the roop extension by checking the box as shown below:

The ‘drop image here’ box is the area to upload your source image.
Other settings are similar to ReActor, but it’s worth noting that the customizable options here are not as extensive as those in ReActor.
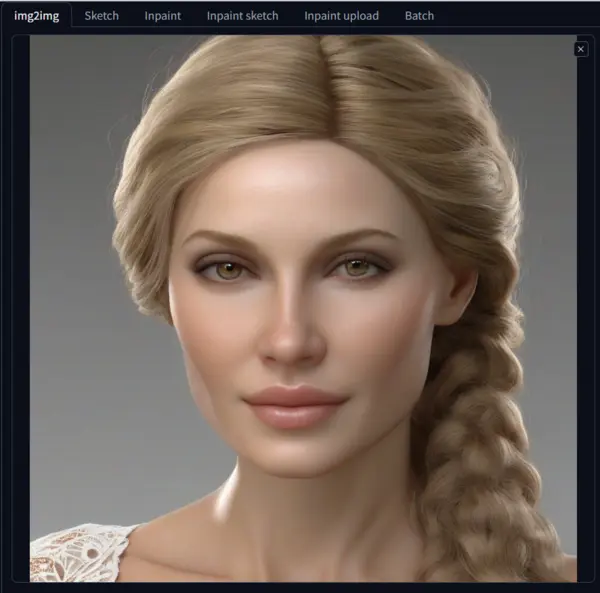
To test the extension’s capability in face swapping I am using ‘img2img’
So, for this upload your source image in the Roop box, in my case the image is:

Now, upload the target image in the ‘img2img’ box and hit the generate button.


In this swapping I am more satisfied than the ReActor, I hope you also agree with this.
Now, let’s make it with multiple faces:
To do this, I am going with the previous source image, and the target and generated images are below:


As I have used 0 in the ‘comma separated face number(s)’ only the first image follows to hire the face of the source image.
If you want to swap both of the images use 0,1.
As we have seen the extensions’ capabilities in face swapping, now let’s see which is the best and why.
Roop vs ReActor: Who is the Winner?
First of all, let me clarify that here we only discuss the face-swapping power of these two extensions, not upscaling.
So, let’s dive in based on the experiment discussed above and in terms of:
1. Fast and Accurate Face Replacement: In terms of speed, ReActor offers much faster than Roop but Roop has more accurate face replacement capability in my opinion.
2. Multiple Faces Support: We have seen both extensions support multiple faces in an image, allowing us to swap or manipulate various faces simultaneously.
But, if you want to more accurate and customizable one then ReActor is your friend.
3. Gender Detection: ReActor includes more gender detection functionality, providing additional control over face swapping based on gender.
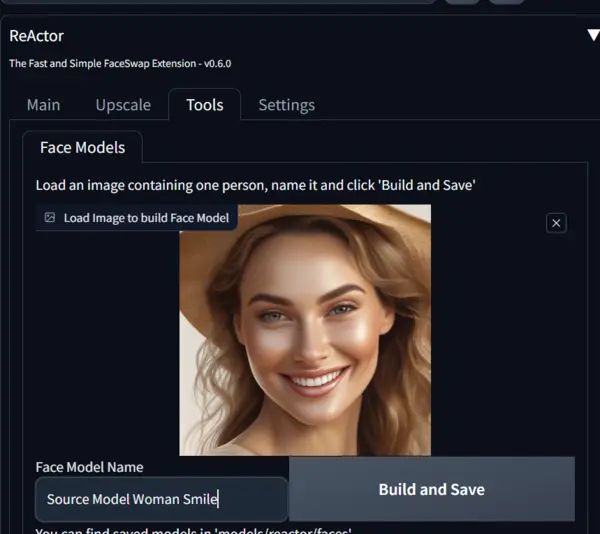
4. Save and Load Face Models: This option is available only on ReActor.
In ReActor you can save your face models as “safe-tensors” files and load them into ReActor, maintaining lightweight face models for reuse.
To do this, upload an image in ‘Tools’, give a name of the model, and hit the ‘build and save’ button.
5. Facial Mask Correction: If you read the article carefully you know that only ReActor includes a “Face Mask Correction” option to address pixelation around face contours.
6. NSFW Filter-Free: Only Reactor is designed without an NSFW filter, targeting a mature audience and promoting responsible use.
Final Verdict:
In conclusion, if you are an expert stable diffusion user and need a face-swapping extension without an NSFW filter, then ReActor may satisfy your need.
But if you are new and need a proper extension, then Roop is yours.
Before leaving, I am requesting you kindly to follow the disclaimer:
Face swapping in image generation is intended for entertainment purposes only. So, exercise caution and use this technology responsibly. Additionally, respect the privacy and consent of individuals depicted in the images.

Hi there! I’m Zaro, the passionate mind behind aienthusiastic.com. With a background in Electronics Science, I’ve had the privilege of delving deep into AI and ML. And this blog is my platform to share my enthusiasm with you.