If your generated images are distorted or you want to improve existing ones, stick around.
Because, here we’ll explore how stable diffusion face restoration techniques can elevate the overall image quality by minimizing noise, refining details, and augmenting resolution.
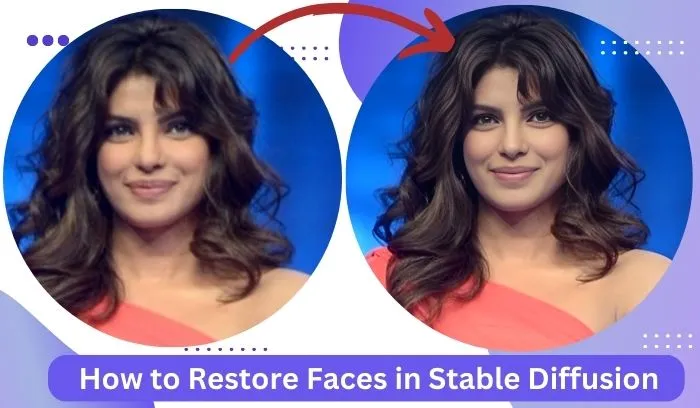
This isn’t just for pros – it’s handy for anyone into photos, videos, or recognizing faces.
So, without further delay, let’s first take a look at how to install Codeformer – our preferred tool for effectively restoring faces in stable diffusion.
How to Setup and Install CodeFormer
To install CodeFormer in your stable diffusion Automatic1111 WebUI, simply follow these steps:
1. Open your webUI and go to settings from the top menu bar.
2. On the left-side menu bar, locate Face Restoration and click on it.
3. Now, choose CodeFormer and make sure to check the boxes as indicated in the image.
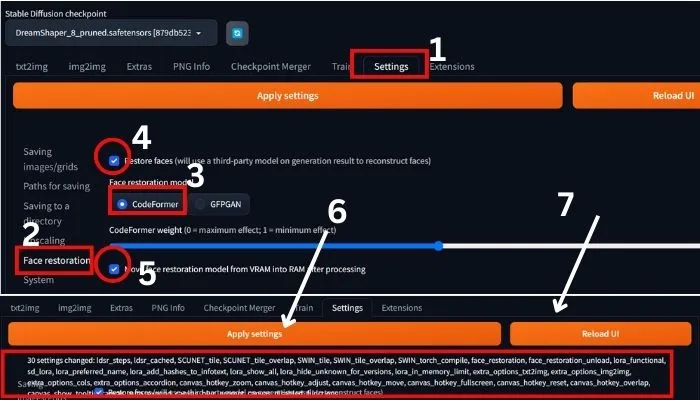
4. After this click on Apply settings, and you’ll receive a notification on your web UI as shown in the 2nd part of the above image.
5. Then, click on Reload UI.
That’s it! Your CodeFormer is now set up to enhance image quality.
But, based on my experience, occasional errors may occur with face restoration.
If you encounter any issues or want to prevent them from the beginning, follow the steps below to activate Face Restoration.
Fix: Stable Diffusion Restore Faces Missing in A1111
If you have not been using it for a while maybe after booting it up your “Restore Faces” addon isn’t there anymore in Automatic1111 WebUI.
So, to make it alive again:
1. After reloading your WebUI again click on Settings and find User Interface from the left side menu bar.
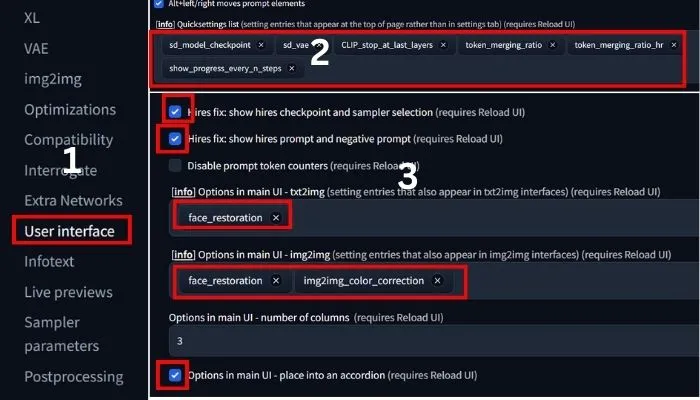
2. Now, scroll down and find the Quick Settings list. Here in the box add all 5 extra tools as shown above(part 2) by searching their name individually.
3. After this again scroll down and find the sections like the above image shown in part 3.
I hope you understand from the image that you should add Face Restoration and img2img color correction in the main UI.
4. And do not forget to check the boxes as I shown in the above image(part 3).
5. Now, again click on the Apply settings, and after seeing the below notice

6. Click on Reload UI.
That’s it your Face Restoration will be again alive.
This is the simple solution in response to the issue of the missing “Restore Faces” addon in the Stable Diffusion UI.
So, now let’s see how the Codeformer works to restore faces practically.
How to Restore Faces in Stable Diffusion with CodeFormer
Before testing its power make sure the Codeformer is successfully installed.
To check it, scroll down your WebUI and see whether there Restore Faces tool is between seed and script as shown below.
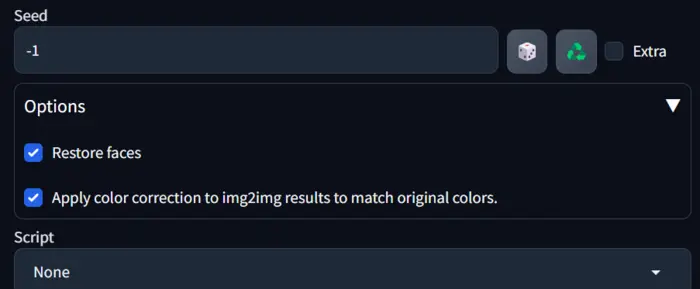
If it has, then check the boxes of ‘Restore Faces’ and ‘img2img color correction’ for better output.
Okay, now let’s test its power by adjusting various values CodeFormer’s visibility, and CodeFormer weight to find the best one.
For this, I am generating an image with a simple prompt: “A beautiful woman, professional, well dressed.”
Now, to restore the face of the generated image in stable diffusion with CodeFormer:
1. First of all, click on the ‘Extras’ tab in your web UI and upload the image in the single image canvas as shown below.

You can the face of the generated image is not good enough, and yeah at this point you need CodeFormer to restore the face. Right!
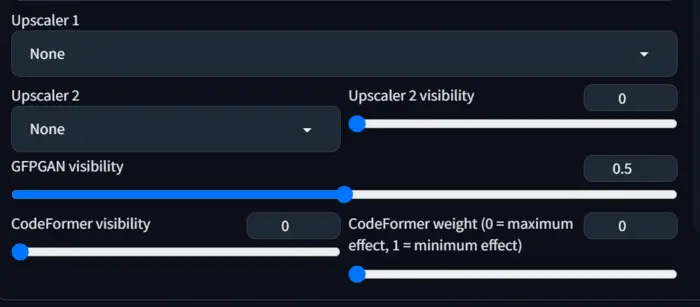
After uploading the image adjust the Codeformer weight and hit the generate button.
To make things easier, I’ve extensively tested CodeFormer weights ranging from 0 to 1, presenting only the top-performing results below.


Closely observe the images special focusing on lips.
I hope you have understood that the best values of codeformer weight are 0.2 and 0.5 to restore a generated image.
If your generated image is low in lighting effects, then you may read our post on stable diffusion lighting guide.
Okay, as it is only about generated images, sometimes we need to restore our old images, right?
So, to do this test I have downloaded an old image of actress Priyanka Chopra Jonas:

The image is blurry, and very poor quality Right?
Now, let’s restore the image by adjusting various codeformer weights:


As you can see all the values of codeformer weight really work well, actually from 0.2 to 0.9 all the values work well to restore an old image.
So, if you have an old image and want to restore it then codeformer is your best option to go.
Now, if you want to check how the GFPGAN model works for this, then reading continues…
How to Restore Faces with GFPGAN
To activate the model in your WebUI, go to settings and find Face restoration.
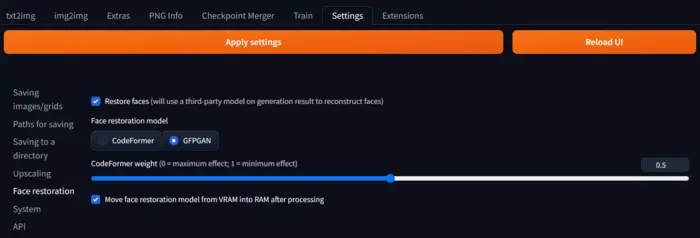
Now, check GFPGAN and the boxes as shown in the above image.
After this, first, click Apply settings and then reload UI.
Now, we are ready to use GFPGAN to restore faces.
So, upload the low-quality image in the ‘Extras’ tab canvas and hit the generate button.
Yes, I also have tested it.
So, let’s check it with CodeFormer.
Stable Diffusion face restoration CodeFormer vs GFPGAN


As in this section, our focus is on finding the best restoration model with the best value, I have compared the GFPGAN restoring image with the Codeformer image(Weight0.5).
If you close focus on the lips you understand that CodeFormer is the best to restore faces.
So, go ahead with codeformer to restore faces in stable diffusion.
But if you need face swapping then you may read our post on how to face swap in stable diffusion.
That’s all for today.
If anything I have missed please let me know by commenting below.

Hi there! I’m Zaro, the passionate mind behind aienthusiastic.com. With a background in Electronics Science, I’ve had the privilege of delving deep into AI and ML. And this blog is my platform to share my enthusiasm with you.
