If you are looking to make your pics cooler with Stable Diffusion Automatic1111 Clip Skip.
You’re right—it’s like a magic button on the Auto1111 WebUI. Need things exact? Turn it down. Feeling creative? Turn it up!
I’ve tried it – Clip Skip makes pics awesome without the tech stuff.
So, in this post, I not only guide you on how to use and enable Clip Skip, but I also do it practically and discuss each and every value of Clip Skip.
Before delving into practical examples, let’s now know a little bit about the tool.
What is Clip Skip and how does it work?
Clip Skip is like your creativity slider – a way to tweak how much of the CLIP model on your stable diffusion system uses when cooking up images.
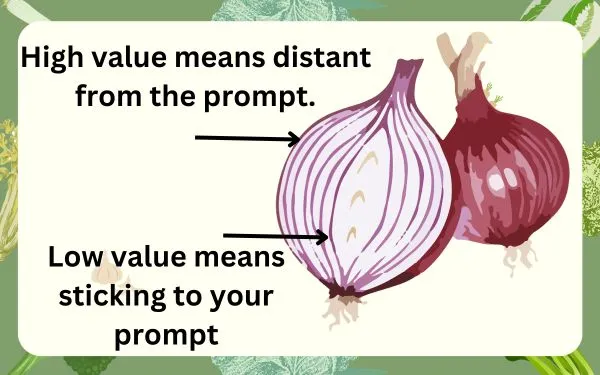
Imagine it as peeling layers off an onion. The lower the Clip Skip value, the closer your image sticks to your words(prompts). Crank it up, and your WebUI gets more creative.
Here’s the scoop: CLIP is this super-smart tool that turns your written ideas(prompts) into a language the computer understands.
Clip Skip lets you decide how many layers of this process you want to use. Less means quicker, more exact results. More gives you a bit of creative freedom.
So, why bother with Clip Skip?
Two things: speed and creativity.
Lower values speed up the image-making, while higher ones let your computer or server flex its creative muscles.
It’s like finding the sweet spot between following your instructions closely and letting the computer’s imagination run wild.
Now let’s install and enable Clip Skip.
How to Install and Enable Clip Skip
To confirm whether Clip Skip is installed or enabled on your UI, navigate to the top and look for it just to the right of SD VAE or SD checkpoint.
If it’s not there, it confirms that you need to install it.
And trust me, setting up Clip Skip in Stable Diffusion (Auto1111) is a breeze! Just follow these 5 simple steps:
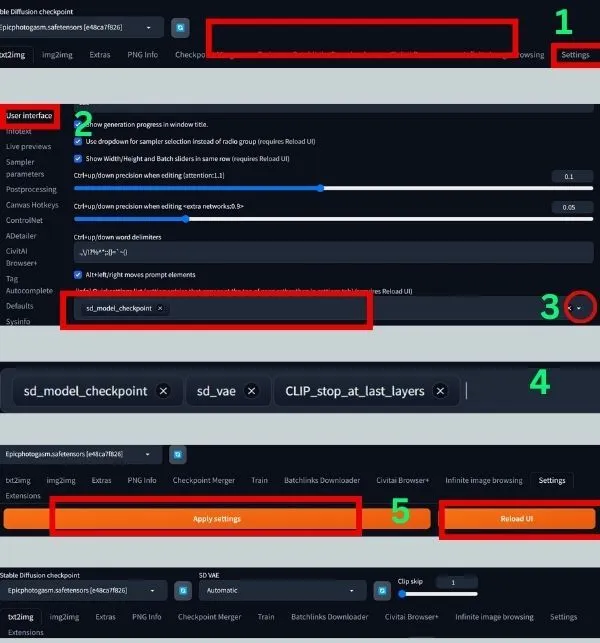
1. Accessing the Settings:
Click the ‘settings’ at the top and scroll down until you find the ‘User interface’ and click on that. Now scroll down once again until you get the ‘Quicksetting list’.
2. Adding Clip Skip:
Here you can see ‘sd_model_checkpoint’, so to add ‘clip skip’ click on the area and type or search for ‘CLIP_stop_at-last_layers’.
3. Applying the Settings:
After selecting the option. Scroll to the top of the settings page.
Click “Apply Settings.” Keep an eye out for the notification confirming the change in the quick settings list.
4. Reloading the UI:
Click “Reload UI” to refresh the interface and integrate Clip Skip seamlessly.
For the smoothest experience, it’s recommended to restart Automatic 1111 entirely.
5. Utilizing Clip Skip:
After the restart, spot the shiny new “Clip Skip” slider at the top of the UI alongside model and VAE options.
The slider’s range?
1 to 12, giving you the power to tweak how much Clip Skip influences your image generation.
I hope you grasp the process of installing and enabling your Stable Diffusion Clip Skip setting.
So, let’s now experiment with different values with different models, and find what clicks let our creativity shine.
How to use Clip Skip in Stable Diffusion
To use Clip Skip, first, we fix some basic things, like Prompt, negative prompt, seed, model, image size, and sampling method.
In my case to run the test,
Prompt: Photo of 30 y.o European man, beard style, high quality, wearing a black shirt, serious face, detailed face, skin pores, cinematic shot, dramatic lighting
Negative prompt: deformed iris, deformed pupils, unrealistic 3d, render, sketch, cartoon, drawing, anime, mutated hands and fingers:1.4, cartoon, cgi, render, illustration, painting, drawing
Steps: 20
Seed: 2462773145
CFG: 5
Model: epiCPhotoGasm and Realistic Vision V5.1(for better understanding)
Image Size: 512 * 768
Sampler: DPM++ 2M Karras
So the only thing we will change during the process is the value of Clip.
Now simply set the clip_skip parameter to the number of layers you want to skip.
For example, if I want to skip all the layers, I would set clip_skip to 12.

You can the models are ignoring the importance of the prompt.


With the clip skip value set to 6, the model begins to prioritize the prompt but lacks details, such as beard style.


At clip skip 3 the image is good enough and the model is following the prompt.
Thus, higher Clip Skip values result in a departure from the prompt, and from the value of 6 donwards, the importance of the prompt begins.
You can also employ the “clip_skip_schedule” parameter to designate a varying number of layers to skip at each stage of the generation process.
This feature proves beneficial for incrementally enhancing the level of detail in the generated image.
So, it’s best to experiment with different Clip Skip settings to see what works best for your desired images.
But like many of us, a very common question is which Clip Skip is better: 1 or 2.
So, now let’s discuss it elaborately to understand how to use Clip Skip deeply.
Stable Diffusion Clip Skip 1 vs 2
To test it, I am using the same prompt. Since the prompt is detailed, and it truly requires detailed input to justify its use.
So, now let’s generate the images,


Clip Skip 1:
I already told you that setting Clip Skip to 1 means skipping one layer in the CLIP model during the text embedding process.
So, in the context of the CLIP model with 12 layers, as I set Clip Skip to 1, it would mean stopping at the 11th layer during the embedding process.
And generate a proper image according to the prompt. But as the model gives best result at 2 the image is slightly dark.
Clip Skip 2:
Similarly, setting Clip Skip to 2 means skipping two layers in the CLIP model during the text embedding process.
And it would mean stopping at the 10th layer during the embedding process.
So, in this value the image is really good and properly follow the prompt.
It’s important to note that the choice between Clip Skip 1 and 2, or any other value, depends on the models and your preference for the level of detail in the text embeddings.
So, if you’re looking for models to experiment with Clip Skip, check out our top picks:
Best Models to Experiment with Clip Skip:
1. Anything V5.0: This powerhouse is your go-to for anime-style gems. Clip Skip takes it up a notch, making your images even more detailed and expressive.
2. Counterfeit V3.0: Perfect for anime and manga lovers, this model captures specific artists’ styles effortlessly.
With Clip Skip, your creations become even more realistic and true to life. It’s like bringing characters to life!
3. Dreamshaper: Looking for versatility? Dreamshaper’s got your back. From realistic photos to abstract wonders, this model does it all.
Clip Skip cranks up the creativity, giving you imaginative images that stand out.
4. BerryMix: Want a painterly touch? BerryMix is your answer.
With Clip Skip, it adds extra texture and detail to your images. It’s like turning your creations into textured masterpieces.
5. K-Main: Going for a cartoony or stylized vibe? K-Main’s your buddy.
Clip Skip makes it even more fun, creating exaggerated and amusing images. Get ready for some laughs!
These are just our recommendations but feel free to experiment with other models as each model has its own charm.
But, before utilizing any model, visit Civitai and review the specifics to determine the optimal value of Clip for your selected model.
When to use Clip Skip:
Clip Skip comes in handy in a couple of situations:
1. Small Dataset Boost: If you find yourself working with a limited dataset, deploying Clip Skip can significantly accelerate the generation process.
This happens because the model doesn’t have to sift through as much data.
2. Stylized Image Quest: If you’re on the lookout for more stylized results, Clip Skip is your go-to tool.
It allows you to bypass certain layers of the CLIP model, granting you increased command over the generated image’s style.
Now, let’s dive into various scenarios for image generation:
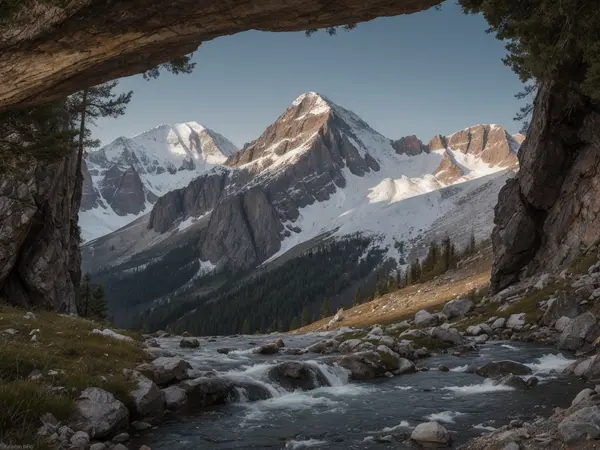
Simple Objects Snap: When crafting images of straightforward objects like balls or cubes, a low Clip Skip value is all you need.
Complex Scenes Unleashed: For intricate scenes such as breathtaking landscapes or vibrant cityscapes, gear up with a high Clip Skip value.
Below is a practical example for the prompt: “A mountain landscape, masterpiece, photorealistic, 4k, 8k, super realistic, realism.”
For more prompts, read our post on Stable Diffusion Landscape Prompts.
People Portrait: Generating images of people demands a high Clip Skip value. This is because the CLIP model needs to meticulously capture the nuanced details of human faces.
So, let’s test a prompt: “A photograph of a beautiful woman, 4k, 8k, super realistic, realism.”


Both images are commendable, but since I specified ‘beautiful’ in the prompt, the image with a value of 11 is more aesthetically pleasing.
And don’t forget to factor in the specifics of your prompt:
Prompt Precision: Adjusting Clip Skip based on prompt specificity can lead to different levels of detail in the generated results.
If your prompts are detailed, opt for lower Clip Skip values for a more granular outcome.
So, let’s take a detailed prompt:
A woman walking in a city street, wearing a black tank top and blue jeans. She is also carrying a handbag. The street is busy with several other people walking around, and there are multiple cars parked or driving along the street.


Yes, high value is ignoring the prompt and low value striks to the prompt for a detailed one.
In a nutshell, Clip Skip hands you the reins for controlling text embedding detail.
The key to mastering it lies in experimentation and understanding your desired level of detail.
Now, before leaving take some tips and start your journey.
Tips for Using Clip Skip:
During our experimentation of using Clip Skip, we learned a lot and found some valuable tips that I am eager to share here.
1. Start Low, Go Slow: Begin with a low Clip Skip value, like 1. It uses the first layer of the CLIP model but results in a low-quality image if your prompt is short.
So, for a good balance of speed and quality, consider values like 3 or 4.
2. Detail Control: Tailor the level of detail in your generated image with Clip Skip.
For a very detailed image, go for a low Clip Skip value with a detailed prompt.
If you fancy something more abstract, opt for a high Clip Skip value.
3. Experiment with 2: If you’re unsure about the Clip Skip value, kick off with 2 and tinker from there. It’s a good starting point for experimentation.
4. Step It Up: Use the steps parameter to regulate the number of steps in the generation process. More steps mean a more detailed image but also a longer wait.
5. Batch Size Matters: When dealing with a large dataset, up the batch_size parameter. This lets the model process more data in each batch.
6. Troubleshoot Errors: If errors pop up with a high Clip Skip value, consider boosting the Batch Size setting.
7. Quality Concerns: If the generated images don’t meet your expectations, play around. Lower the Clip Skip value or experiment with a different sampling method.
In conclusion, play around with the values, keep an eye on speed and quality, and don’t hesitate to experiment to find what works best for you.

Hi there! I’m Zaro, the passionate mind behind aienthusiastic.com. With a background in Electronics Science, I’ve had the privilege of delving deep into AI and ML. And this blog is my platform to share my enthusiasm with you.