No more struggling to restore old photos, remove unwanted objects, and fix faces and hands that look off in stable diffusion.
You can do it easily with just a few clicks—the ADetailer(After Detailer) extension does it all automatically.
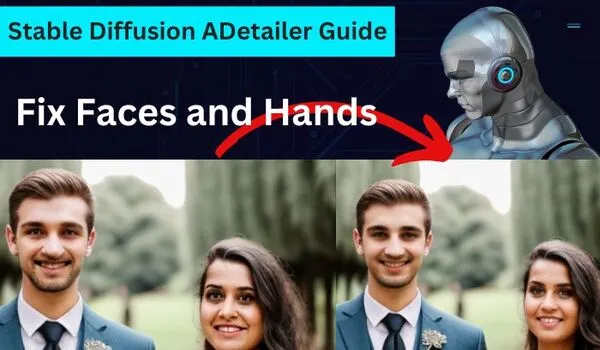
Whether you love creativity or just enjoy generating images casually, this extension is designed to enhance your photos to look better without any hassles.
In this guide, we’ll show you how to use ADetailer in Stable Diffusion and go through its all settings and possible use cases.
How to Install After Detailer Extension in A1111
First of all, let me clarify that the Adetailer extension is available for the Automatic1111 WebUI.
Whether you are using Mac, Windows, or Google Colab, you can install ADetailer with a few clicks.
But before installing, check if the extension is in your WebUI or not.
Check Whether it is Installed or Not: After opening Automatic1111, go to ‘Extensions’, and then click on ‘Installed’.
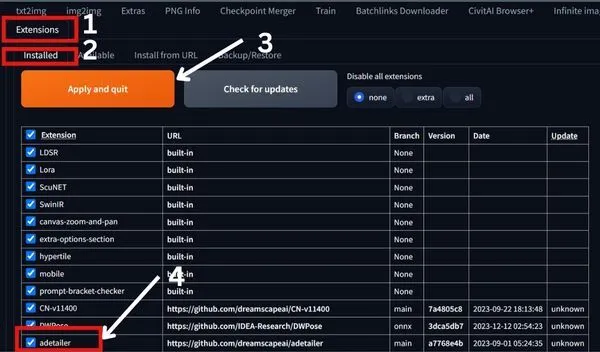
Look for the ADetailer extension.
If not found, click on ‘Available’.
Now, on this page, click on ‘load from’ to check its availability.
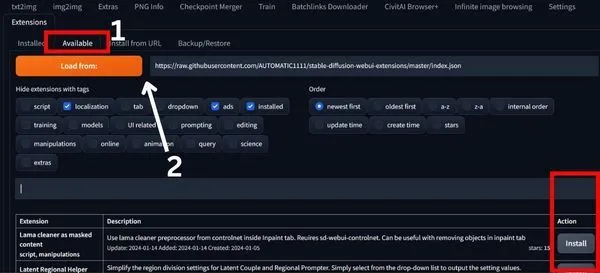
Now you can see there are some extensions loaded. So search for Adetailer in the search box.
If you find it, click on ‘install’, and you can see it on the right of the extension.
But, still, if you don’t find it in your UI, just follow the below steps to install ADetailer in A1111 from the URL:
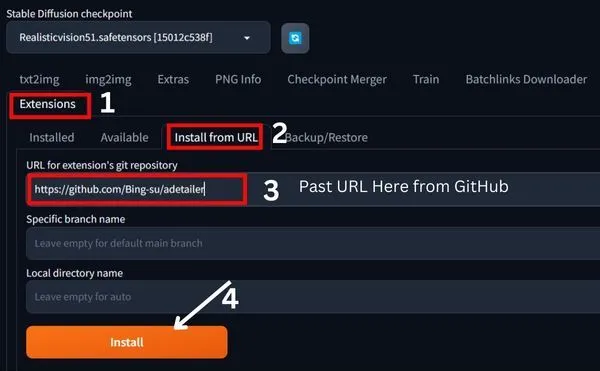
1. Go to the Extension Tab and click on ‘Install from URL’.
Here, input the URL: ‘https://github.com/Bing-su/adetailer’ as shown in the image below.
2. Then click Apply and wait a while. After showing the successful notification, hit the ‘Reload UI’ button.
That’s it! You’ll have the Adetailer extension seamlessly integrated into Automatic1111.
But, before proceeding further, you may need to change some settings in the ‘After Detailer’ extension.
Special Settings
To check this, go to the settings of your WebUI and click on ‘ADetailer.’
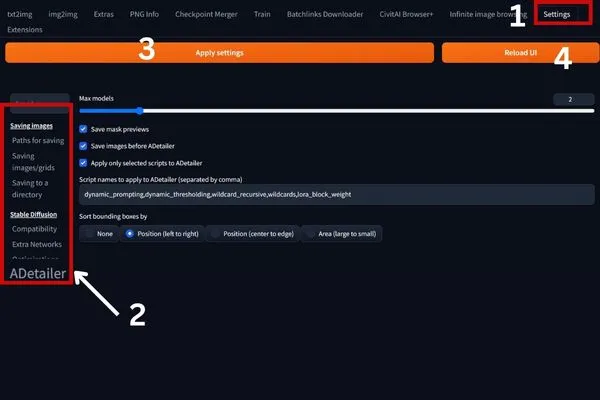
You can there are three boxes:
If you want to save the mask previews, check the box. Similarly, read the options below and check the boxes as you desire.
Finally, select how you want to see ‘bounding boxes’ by checking any of the dots, as shown in the image above.
In my case, I have chosen the position ‘left to right.
Now, select the number of ‘Max models’ by sliding the line, in my case as in this post my focus is on faces and hands, so I have set it at 2.
Now click on Apply and wait for the notification like below, after this Reload the UI to save all the settings.

Now, let’s explore its capabilities to boost and improve our AI image generator.
How to Fix Faces and Hands Using ADetailer Extension
You can use ADetaile in various ways, so here we will discuss only the effective and easy ways that everyone can understand and apply in their work.
First, we see how the ‘tex2img’ tab works with ADetailer and then explore the ‘img2img’ tab with After Detailer parameters and ControlNet.
Txt2img Tab:
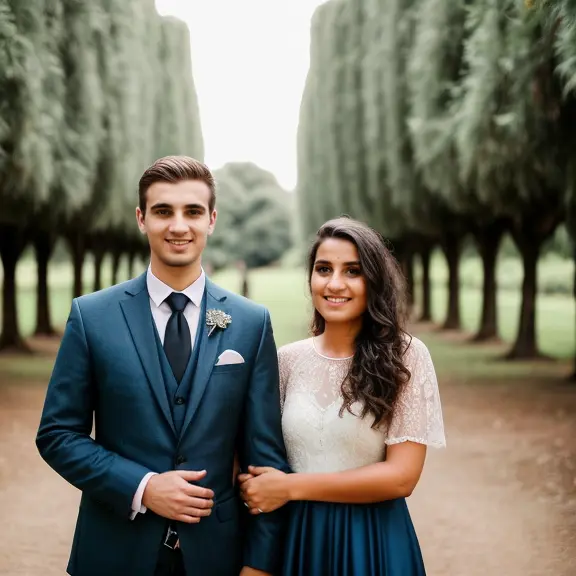
First of all, generate an image with ‘text2img’ tab, but you can also use any images that you have.
In my case, I am generating an image by the following aspects:
Prompt: “A loving couple, standing together in front of a camera, both are well dressed, faces toward the camera, and their hands should show in the image”
Negative prompt: “More than two humans, cropped, out of frame, bad anatomy, cartoon, anime, unrealistic.”
- Model: RealisticVisionv51
- Sampler Metode: DPM++ 2M Karras
- Image Size: 576*576
- Steps: 20
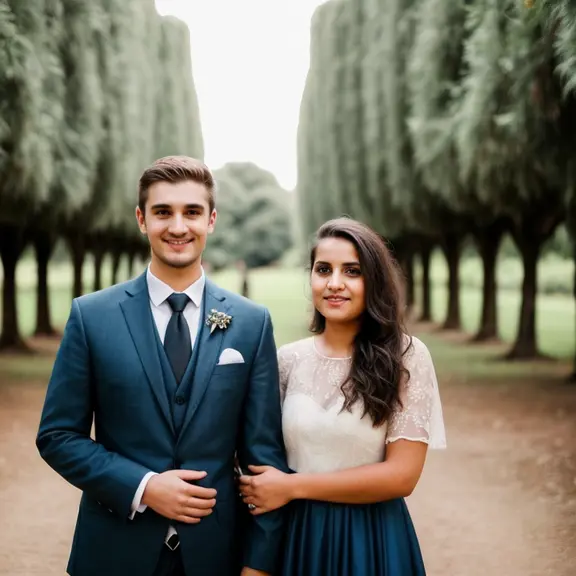
The generated image is:

You can the image is very bad in terms of faces and hands.
So, now, I have an image to fix its hands and faces. To do this:
1. Upload the image in the PNG Info tab and send it to txt2img.
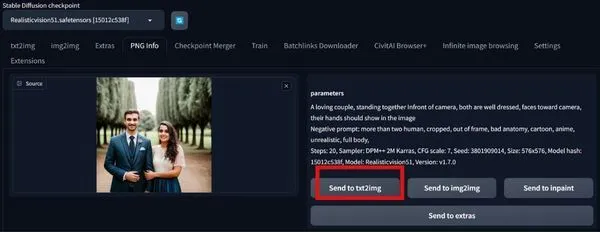
In this way, all the parameters of the image will automatically be set to the WebUI.
In short, it helps to find prompts history in stable diffusion.
2. Now, enable the ADetailer, and select an ADetailer model for faces and hands respectively.
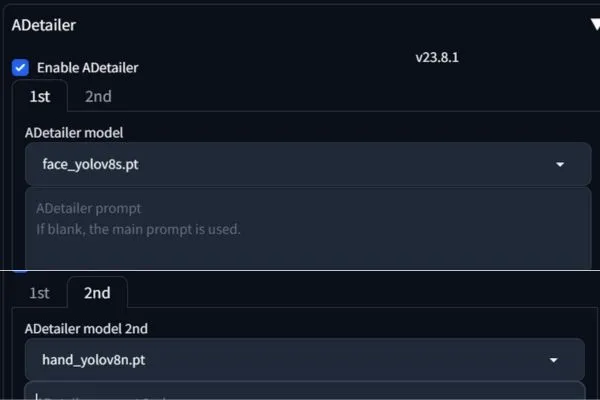
For instance, I am selecting ‘ace_yolov8s.pt’ for faces and ‘hand_yolov8n.pt’ for hands.
For a quick understanding, I am going to with a random ADetailer model, but fear not I will cover all the models’ details and comparisons in this post later.
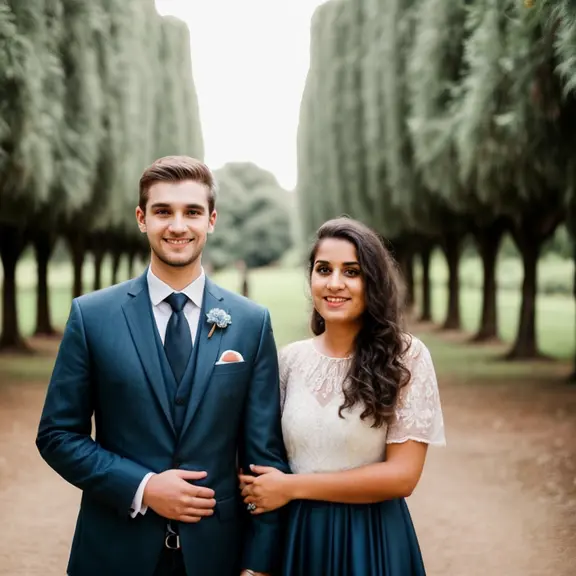
3. Now hit the generate button and wait for the result.

You can see the faces are fixed at a certain level but the fingers don’t fix properly.
If you have a particular issue, especially with faces then ‘txt2img’may solve it at a certain level with a good ADetaile model.
But, if there is more than one error in various elements of the image, then you should use all the ADetailer parameters.
Understanding After Detailer Parameters:
So, now let’s first understand all the key parameters to fix all the complex issues related to generated images and then use them in the ‘txt2img’ tab.
Detection: This setting determines how confident After Detailer needs to be about a detection before it will inpaint it.
A higher threshold will mean that fewer things are inpainted, but it will also mean that the inpainted things are more likely to be accurate.
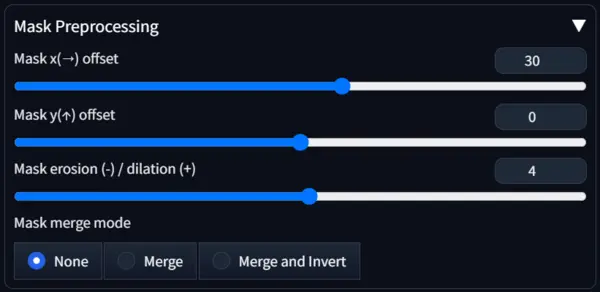
Mask Preprocessing: These settings allow you to fine-tune the size and shape of the masks that After Detailer will use for inpainting.
You can also use them to merge or invert masks.
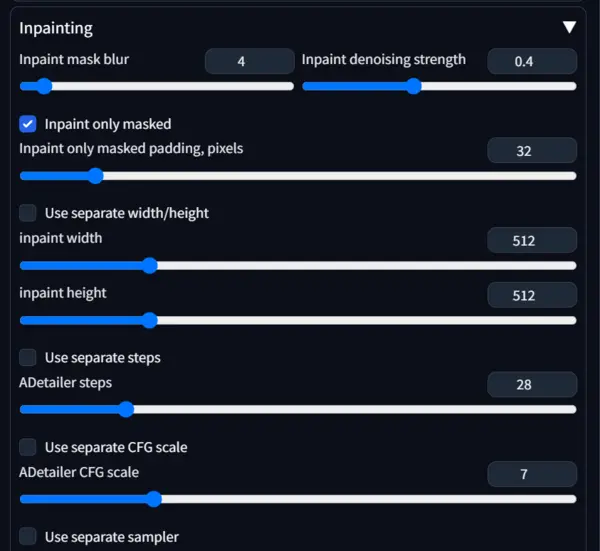
Inpainting: These settings are similar to the settings in the regular Stable Diffusion inpainting interface.
You can control things like the blur, the padding, and the denoising strength.
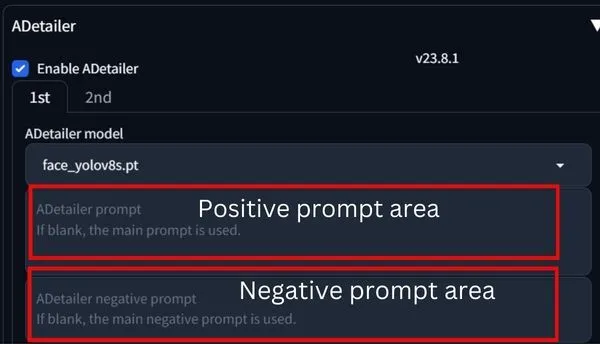
ADetailer Prompts: If you are using Inpaint Canvas, you can add some extra words to specify your image.
As I am using the PNG info tab, here I want to keep it blank. In this scenario, ADetailer uses the original prompt that I used to generate the image.
If you use both the txt2img prompt and ADetailer prompt, the image composition may change.
So, only use this tab with inpainting.
Alright, I hope you grasp the parameters; if not, remain patient and peruse the following section—it will undoubtedly clarify.
Img2Img(Inpainting) with ADetailer Parameters
First, upload the image whose faces and hands you want to fix in the PNG Info tab and send it to the Inpaint canvas of the img2Img tab.
Now, Use the following settings for better results:
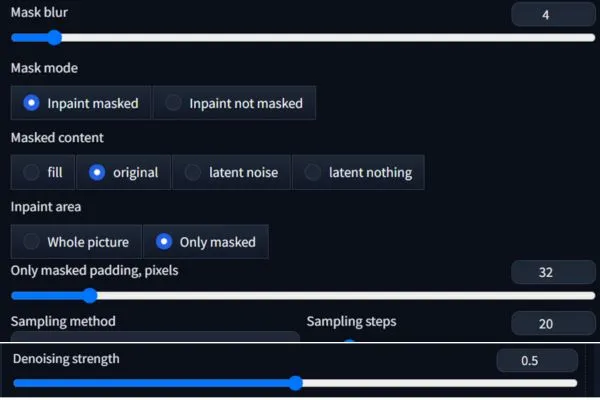
For the Inpaint area: Select Only masked
For Mask mode: Select Inpaint masked
For Masked content: Select Original
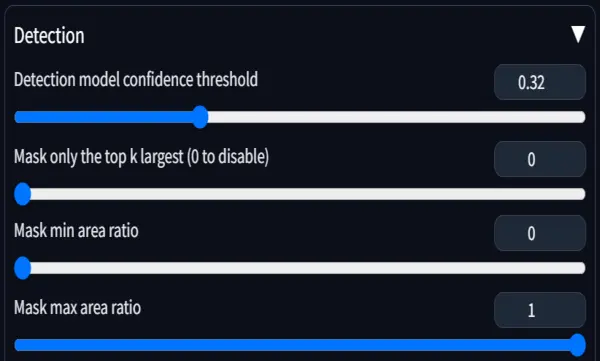
Detection model confidence threshold: 0.32(Default Value)
For Denoising strength: Keep it at 0.5
ADetailer Model: In my case, I am selecting ‘ace_yolov8s.pt’ for faces and ‘hand_yolov8n.pt’ for hands( You can go with others)
For Inpainting: Mask the Area as I do in the image of ‘Inpainting’.
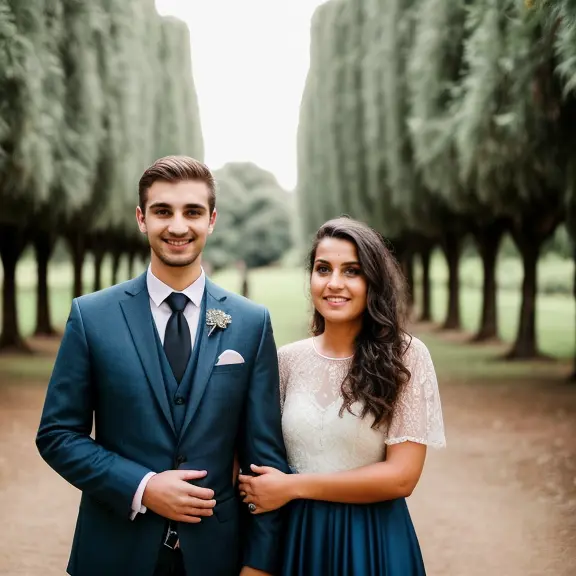
After all settings, hit the generate button.
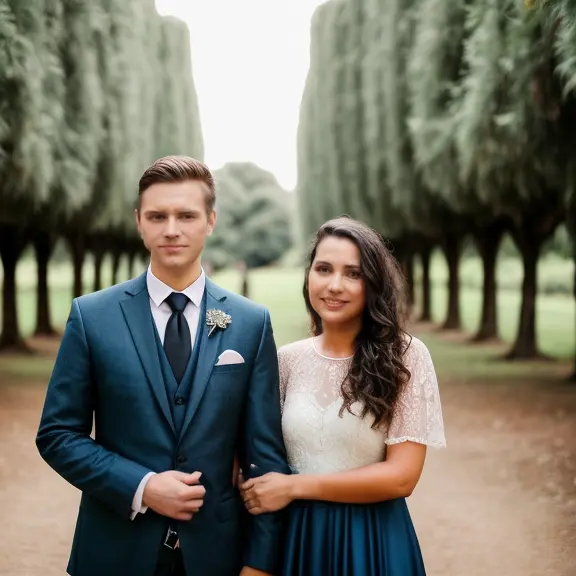
You can observe that both characters’ fingers and faces are fixed at a decent level.
You may notice what seems to be an extra finger on the left hand of the female character, but it is not.
If you closely examine it, you will find that it is the finger of the right hand of the female character.
Okay, now let’s change the setting and see what happens.


With Denoising strength 0.7 the expression of the characters changed and the reaming parts are fixed as well.
With the Detection model confidence threshold of 0.5 the characters’ faces are fixed at a decent level but the fingers of the female character are not very well.
So, do test the other values and find your desired one, for now, let’s move forward.
How to Use ADetailer Extension with ControlNet
You can utilize the ControlNet extension if you have ControlNet installed along with ControlNet models.
According to the GitHub repository, ADetailer exclusively supports inpaint, scribble, lineart, openpose, and tile ControlNet models.
Therefore, ensure to install only these models.
ControlNet is beneficial in maintaining your image’s overall composition, especially when inpainting large areas.
However, for our specific scenario, our focus is solely on faces and hands.
So, to proceed, upload the image onto the inpainting canvas of the img2img tab.
Then, select the ControlNet model for ADetailer as shown above and click the generate button.
Here I am showcasing images generated with all the 5 ControlNet models that already mentioned.

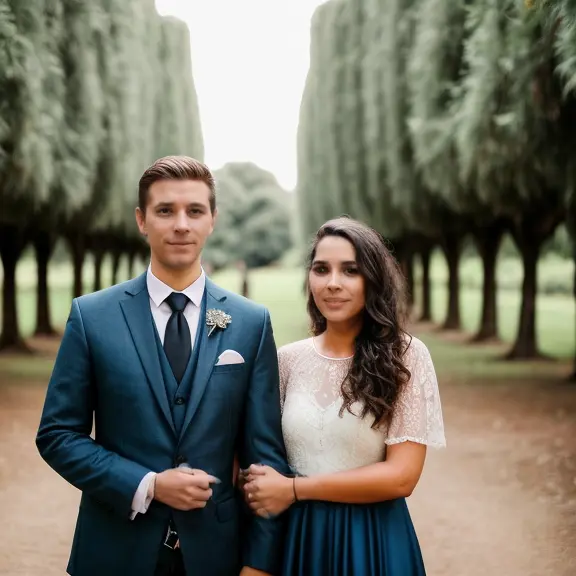


You can see only Linrart and tile models are performing well, others are not for use.
My recommendation is if you really want to use Adetailer extension with ControlNet models then go with the Lineart model.
It not only fixed the error of faces and hands it also improved the overall image quality as you see our generated image.
That’s all about ADetailer usage.
Now, as promised we find the best ADetaile models, below is our verdict.
Best ADetailer Models to Fix Faces and Hands
After Detailer has several different models for detecting and inpainting different parts of your image.
You can choose from face, body, hand, and eye models.
Each model has strengths and weaknesses, so you may need to experiment to find the best one for your image.
But for now, I am showing all the results generated with 5 sets of different ADetailer models to fix faces and hands.


You can see the results.
In our recommendation to fix faces, you can go with face_yolov8s.pt, and for hands hand_yolov8n.pt.
But the choice is yours.
So, run the test of all the models and find your one, you can find the YOLO models on Hugging Face.
But, before leaving check the below part as many users get errors while using the ADetailer extension.
How to Fix: ADetailer Not Working
If you’re facing the ADetailer not working problem, don’t worry.
This part of the ADetailer guide will walk you through a series of steps to troubleshoot and resolve the issue.
Step 1: Check Installation and Configuration
The first step in resolving the ADetailer not working issue is to verify the correct installation and configuration of the extension.
So, follow the steps as I mentioned above.
Step 2: Enable and Configure ADetailer
The second step involves enabling and configuring ADetailer within the Stable Diffusion interface. Follow these guidelines:
Enable ADetailer: Navigate to the ADetailer tab within the interface and make sure it is enabled. This step is essential for the extension to start working.
Configure Parameters: Check and adjust the necessary parameters and settings within ADetailer as I told you.
Ensure that details such as the model type and denoising strength are configured appropriately for your specific use case.
Step 3: Seek Community Support
If the ADetailer issue persists despite following the above steps, consider seeking help from the community.
Many users may have faced similar problems and can provide valuable insights.
Here’s the community support page for ADetailer.
You can also post your issue on relevant community platforms such as Reddit or GitHub discussions.
Describe the problem in detail, including any error messages or unusual behavior you’ve observed.
Fellow users and developers may offer solutions or workarounds.
Step 4: Additional Recommendation
If, after exhausting the above steps, you still find yourself struggling with the ADetailer not working problem, you may want to explore an alternative solution.
Consider using CodeFormer to restore faces in your images.
CodeFormer is known for its reliability in handling various image-related tasks and could serve as a suitable alternative.

Hi there! I’m Zaro, the passionate mind behind aienthusiastic.com. With a background in Electronics Science, I’ve had the privilege of delving deep into AI and ML. And this blog is my platform to share my enthusiasm with you.