At times, we generate images and overlook them, but later, we realize that the prompt was good.
Additionally, we may also encounter images from others that we admire and wish to replicate using Stable Diffusion.
In such scenarios, we search for Stable Diffusion prompt history and possible ways to find the prompts for images.
That’s why in this post I guide you on how to get Prompts from:
- Images (2 Practical Ways)
- Prompt History Extension
- Automatic1111 Prompt History Tab
And lastly, we will show you how to save prompts in stable diffusion.
How to get Prompts from Images
If you are seeking to get prompts from images, there are two possible ways to find them.
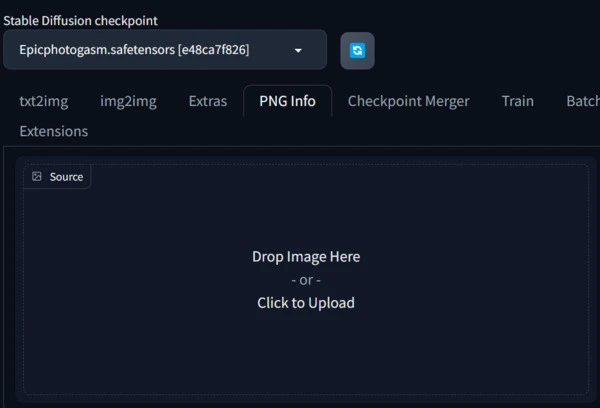
1. From PNG Info:
It is the easiest way to find prompts from images.
If you’re a pro user of stable diffusion, you likely already know the process; at this point, feel free to skip ahead to the second method.
But for those who are new or do not know how to find prompts from PNG info just follow the below steps.
Click on PNG Info and upload your image.
In my case, as you can see below, I uploaded the image and found all the information about the image including the prompt.
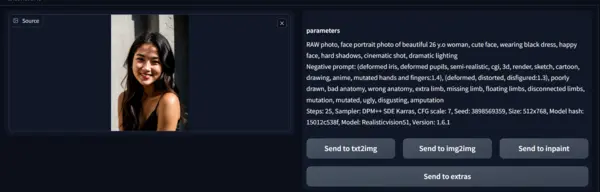
Now, click on text2img to test the prompt and find all the parameters and prompts in your text2image canvas.


It is truly remarkable—notice how the images are nearly identical except for the poses.
If you want to generate images with proper lighting effects like above, check our post on stable diffusion lighting guide.
Now, during our experimentation, we discovered that the first method often proves ineffective.
The reasons are:
- The generative information might not have been saved, or removed during image optimization by the web server.
- The image is not in PNG form or generated by Stable Diffusion.
So, in this scenario, we should use the CLIP interrogator extension even if your image is not generated by AI.
2. From Interrogate CLIP:
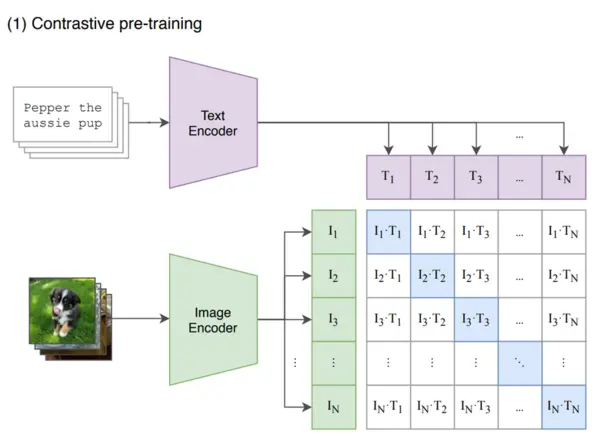
CLIP is a big language model trained on loads of text and images. It can handle various tasks like describing images, answering questions about pictures, and creating images from text.
So, let’s dive into how to use it to get prompts:
How to use Interrogate CLIP to View Prompt
First of all, make sure that you are using Automatic 1111 WebUI because the CLIP interrogator is its native feature available on the img2img page.
If you are using it, then open your Automatic 1111 WebUI and go to the img2img page.
Now, it’s time to upload an image.
In my case, I am uploading the same image that was uploaded in PNG info canvas.
After that click Interrogate CLIP to get the prompt of the uploaded image.
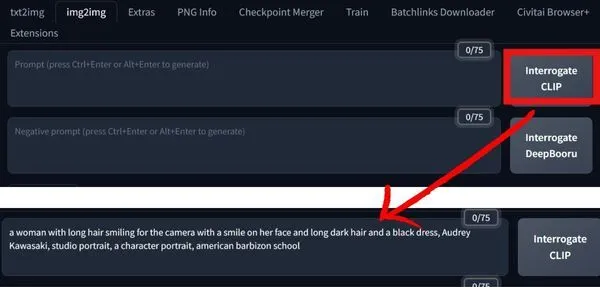
In my case, I get the prompt:
“a woman with long hair smiling for the camera with a smile on her face and long dark hair and a black dress, Audrey Kawasaki, studio portrait, a character portrait, american barbizon school”
But here you do not get negative prompts and other parameters.
So, to test the prompt I just need a good Stable diffusion or SDXL negative prompt.
My negative prompt: “blurry, cropped, anime, nude, cartoon, unrealistic, bad quality, low quality”
In my case, as it is a realistic image I am using the above negative prompt.
Now, let’s test the prompt.

The image closely resembles the uploaded one but may not match the quality of the image generated by PNG Info.
Since we only receive prompt-related information in this process, for optimal results, I suggest starting with PNG Info.
If that doesn’t yield the desired outcome, then proceed with this step or add a prompt history extension.
Stable Diffusion Prompt History Extension
If you are using ComfyUI, then you have Prompt History Extension by default.
But if are using Automatic1111, it does not have the extension.
So, in this scenario, you should use the SD WebUI Prompt History extension developed by the Stable Diffusion community.
Now, before jumping into the process of finding prompt history, let’s see how to install it.
1. Open up your Stable DiffusionAutomatic111 WebUI and click on ‘Extensions’ at the top of your screen.
2. Within the Extensions menu, find and click on “Install from URL.”
Here you’ll see a space to type or paste a web address (URL).
3. Once you’ve entered the URL, there should be a button that says “Install”. Click it.
It might take a moment to install, so be patient.
4. After installation, close and reopen Stable Diffusion.
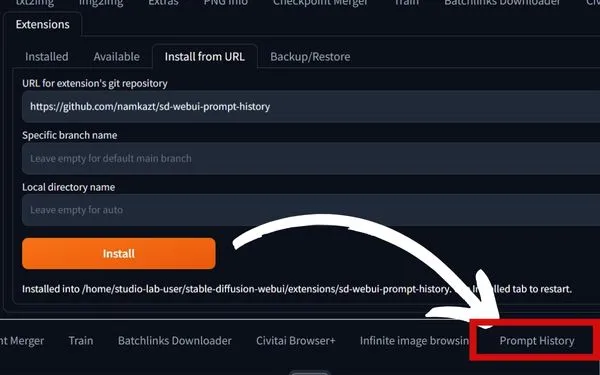
Once Stable Diffusion is back up, look at the top menu. You should see a new tab called “Prompt History.”
And that’s it! You’ve successfully installed the extension.
Now, if you ever need to check what you’ve asked Stable Diffusion before, just click on the “Prompt History” tab, and you’ll have your history right there.
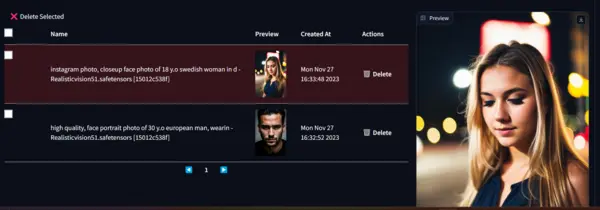
To access all the details of a specific prompt, click on it as demonstrated above, then click “Apply.”
This will reveal all the parameters and the prompt associated with the image.
Now, if you want to view the last prompt you used in Stable Diffusion, there’s no need to install an extension.
Automatic1111 Prompt History Tab
Yes, you can view the prompt by your Automatic1111 prompt history tap.
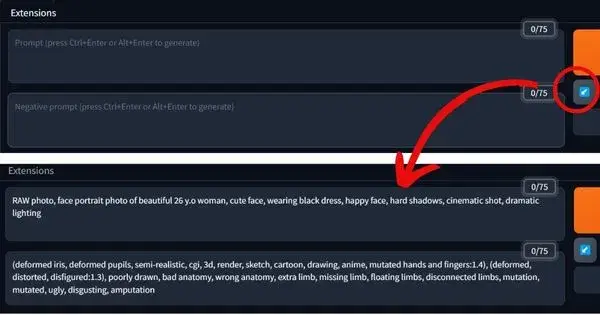
To do that just click on the blue icon as highlighted in the image and you will get the prompt and negative prompt as well.
In these four practical methods, you can view your prompt history and extract prompts from images in Stable Diffusion.
Before leaving, let me address the below FAQ that may come to mind while working on the stable diffusion prompt history.
Does Stable Diffusion Save Prompts?
While it may not inherently retain a memory of past prompts excluding last one, there are ingenious ways to access or recreate your previous inputs.
So, here, we’ll explore two distinct methods to unveil the prompts from your creative journey.
1. Metadata Within Generated Images:
The key to unlocking the past lies in the metadata embedded within the generated images.
For original images, follow these steps:
- Right-click on the image.
- Select “Properties” or “Get Info.”
- Navigate to the “Details” or “Image Description” tab.
Here, you’ll find a treasure trove of information about the prompt and settings used during the initial image generation.
If you’re dealing with upscaled images, be aware that metadata might not be preserved in these cases.
In such instances, refer back to the metadata of the original image to uncover the details of your creative process.
2. Manual Tracking:
For those who prefer a more hands-on approach, manual tracking offers a reliable method to keep tabs on your creative evolution.
Maintain a Record: try to create a personal record of your prompts and settings.
Whether it’s a digital document, a notebook, or a dedicated file on your computer, having a centralized space to document your creative choices ensures easy access in the future.
Utilize Browser History: If you’re working within a web-based interface, leverage your browser’s history feature.
Revisit recent prompts effortlessly by scrolling through your browsing history.
This method is particularly effective for retracing your steps and revisiting specific moments in your creative journey.
That’s all for today, if there’s something I’ve overlooked or if you encounter any challenges on your end, please inform me in the comments below.

Hi there! I’m Mithin, the passionate mind behind aienthusiastic.com. With a background in Electronics Science, I’ve had the privilege of delving deep into AI and ML. And this blog is my platform to share my enthusiasm with you.