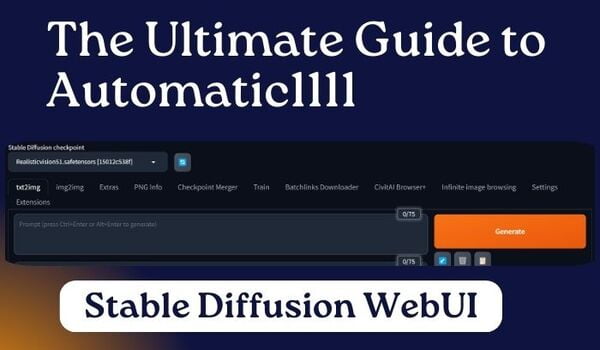
Automatic1111 or A1111 is the most popular stable diffusion WebUI for its user-friendly interface and customizable options.
Whether seeking a beginner-friendly guide to kickstart your journey with Automatic1111 or aiming to become a pro, this post has got you covered.
In this post, I’ll cover all aspects related to how to use Automatic1111 stable diffusion WebUI, from the interface to all the elements.
So, if you want to begin from scratch, read the entire article patiently. If not, feel free to jump to your desired section below.
First: Download and Install Automatic1111
You can use the stable diffusion WebUI in Windows, Mac, and Google Collab.
But before you embark on your creative journey, make sure your system meets the requirements.
So, let’s dive into everything you need to know to set up Automatic1111 and get started with Stable Diffusion.
Hardware Requirements:
1. GPU: A discrete NVIDIA GPU with a minimum of 8GB VRAM is strongly recommended. Aim for an RTX 3060 Ti or higher for optimal performance.
While 4GB VRAM GPUs might work, be aware of potential limitations, especially when dealing with finding the best image size for stable diffusion.
2. CPU: Opt for a modern processor, such as an i5 or Ryzen 5, to ensure smooth performance.
3. RAM: Aim for 16GB or more for an ideal experience.
4. Disk Space: Allocate at least 10GB of free space on your system.
Operating System:
Choose from the following operating systems:
- Windows 10 or higher
- Linux
- macOS (additional setup required for Apple Silicon M1/M2 chips)
Software Requirements:
1. Python: Ensure you have Python version 3.10.6 installed. Avoid using Python 3.11 or newer.
2. CUDA Toolkit: For NVIDIA GPUs, a minimum of version 11.7 is required.
3. Git: Install Git for cloning the repository.
Additional Considerations:
AMD GPUs: While not officially supported, some users have reported success with AMD GPUs using experimental methods.
Cloud Services: If your local machine doesn’t meet the requirements, consider using cloud services like Google Colab or platforms offering managed Automatic1111 access, such as Think Diffusion.
If you want to explore more services, read our post on the best Google Collab alternatives for stable diffusion.
Installation Guide:
1. Install Python 3.10.6: During installation, ensure you select the option to add Python to your PATH. Avoid newer Python versions (3.11+).
2. Install Git: You’ll need Git to clone the repository.
3. Clone the Automatic1111 repository:
Windows: Run `git clone https://github.com/AUTOMATIC1111/stable-diffusion-webui.git` in an elevated command prompt.
Linux/macOS: Run `git clone https://github.com/AUTOMATIC1111/stable-diffusion-webui.git` in a terminal.
4. Download a Stable Diffusion model file: Choose a pre-trained model from sources like Hugging Face and CIVITAI.
We always recommend using Safetensors files for better security and safety.
5. Run the web UI:
Windows: Navigate to the stable-diffusion-webui folder, run `update.bat` to update the codebase, and then `run.bat` to start the web UI.
Linux/macOS: In the stable-diffusion-webui folder, run `python -m webui` to start the web UI.
Now, you’re all set to explore the endless creative possibilities of Stable Diffusion with Automatic1111.
Now, let the artistic journey begin together!
Exploring Interface for Basic Usage
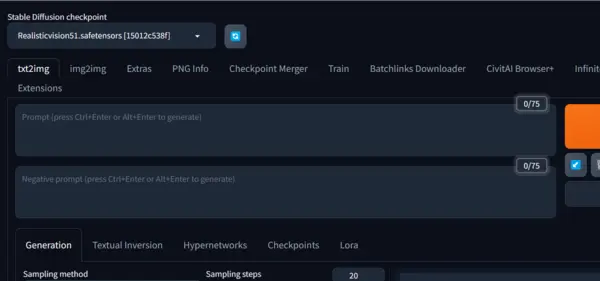
When you first land on your A1111 WebUI, you can generally see the following interface.
I know you see there are many options to play with and customize on the webui.
That’s why I am starting with the basic usage of stable diffusion.
Text to Image:
The name itself says it is the tab to generate images from text, which we call a prompt.
But you are seeing two sections, right?
One is ‘prompt,’ and another is ‘negative prompt.’
Prompt: It is the area where you describe your image, especially focusing on what you want in your image.
Negative prompt: This is the area to tell the AI what you do not want to see in your image.
Okay, now let me clarify this practically.
For this, I am taking a random prompt and a negative prompt.
Prompt: “A beautiful woman, well-dressed, realistic, a masterpiece.”
Negative prompt: “Unrealistic, cartoon, anime, blurry, low quality.”
I just put these in the desired section and hit the generate button.
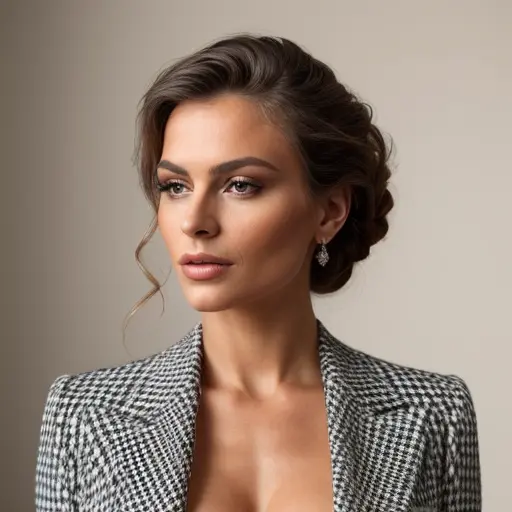
You can see the image is pretty cool.
When you are writing prompts, try to keep it within 75 characters because the model supports only 75 characters.
You can do a lot of things with the generated image by adjusting various parameters, which we will discuss later in this post.
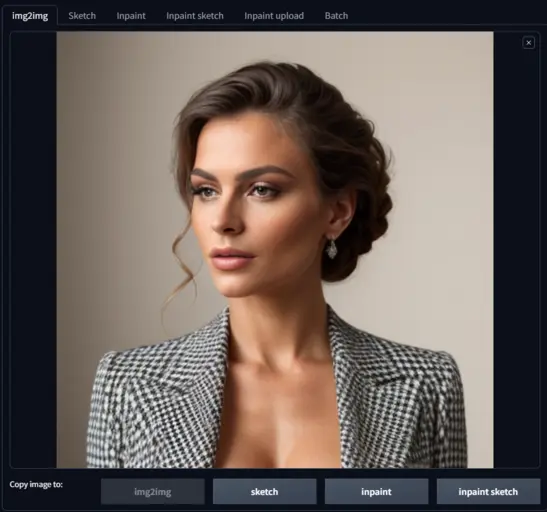
For now, let’s move to the img2img tab.
Img2Img:
Img2img in stable diffusion, also known as image-to-image, is a method that creates new AI images from a picture and a text prompt.
The resulting image keeps the colors and layout of the original picture, letting us add a personal touch with text to turn simple sketches into awesome artwork.
Now, let’s talk about its features:
Img2Img with Text:
Start by uploading an image you want to base the next one on.
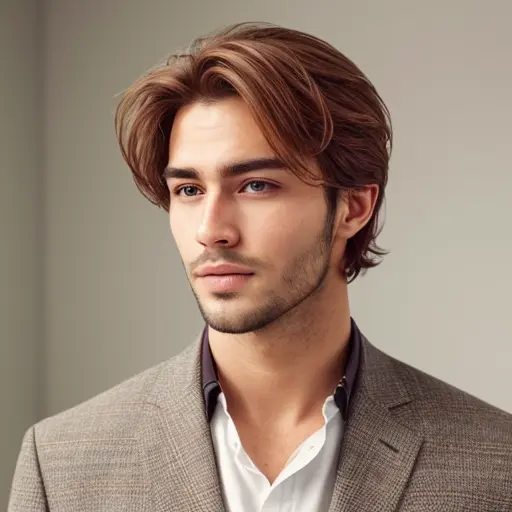
In my case, I want to make a picture of a good-looking man using the colors and composition from my last picture.
So, I upload the previous image, type ‘A handsome man’ in the prompt box, and click generate.

The new image is a man, but the colors and layout are from the previous one. Right!
Now, let’s move on to the next part of the img2img tab.
Sketch:
It’s like a painting tool to sketch on an uploaded image.
Here, you have tools like a brush to change color, a pencil icon to adjust sharpness, and an eraser.
I upload the first image and keep the text ‘A handsome man.’
I want to color my character’s hair red.
After painting, there’s a special setting.
Scroll down and find the settings as shown below, then click ‘Only mask.’
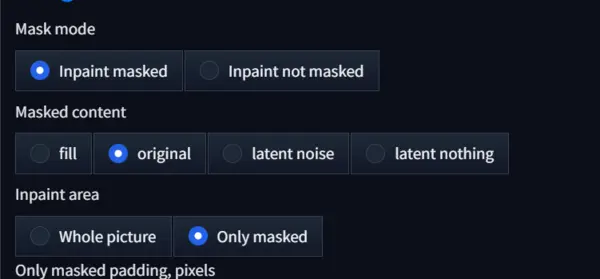
It helps the AI focus on your masked area.
Now, click generate and see what happens.
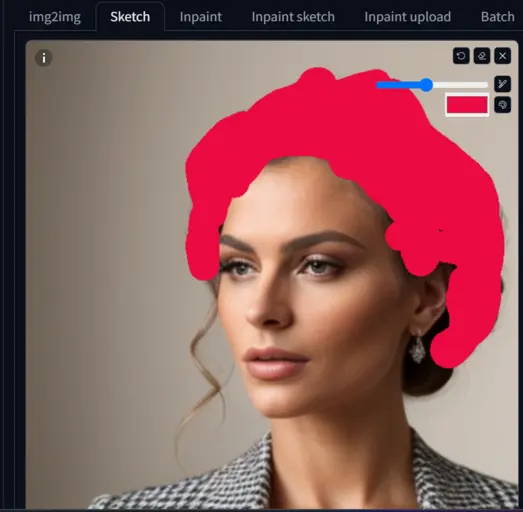
Wow, the man’s hair looks cool in reddish.
If you want a richer color, adjust the Denoising stretch.
Let’s add glasses to the guy’s face to make it clearer.
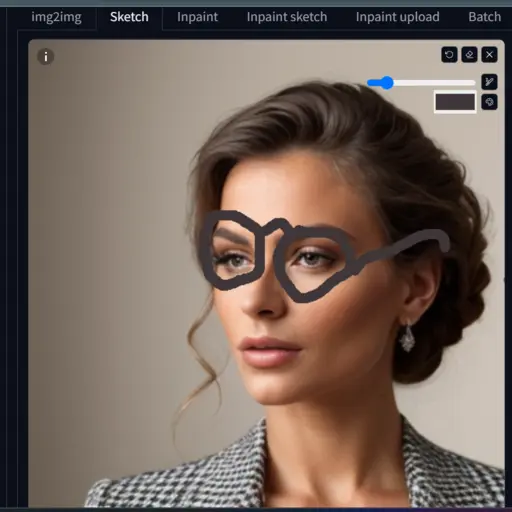

Cool, right?
I hope you’re enjoying it too. So, play with this tool after reading the full Automatic1111 tutorial.
Inpaint:
This tool lets you add, remove, or enhance any part of the uploaded image.
Don’t worry; it’s straightforward.
Just upload the image, mark the area, and explain your desire in the prompt box.
To explain, I’m doing two things:
a) I want to improve the eyes of my first image.
Upload the image, mark the eyes, and type ‘A beautiful woman, attractive bluish human eyes’ in the prompt box.
After that click Generate,
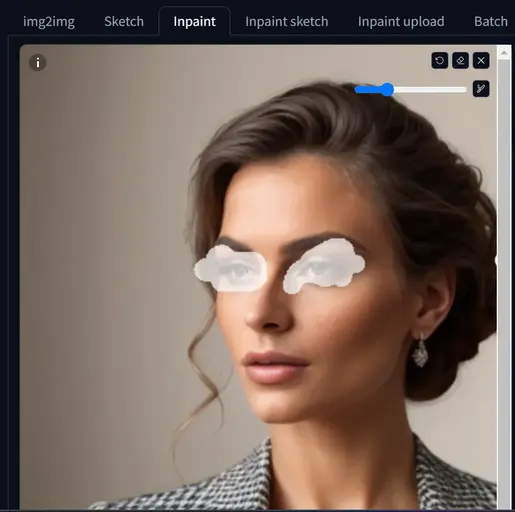

Now, the eyes look more attractive with a bluish color. Right!
But you can’t specify the color by masking with the tool ‘inpaint’; you have to specify it in the prompt box as I do.
b) Now, I want to remove the rings from my character.
Mask the rings and add ‘earrings’ in the negative prompt box.
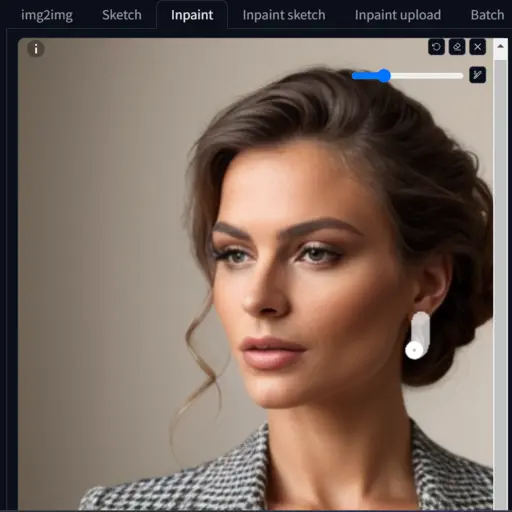
Wow, the rings are gone now.
Now, move to the 4th section of img2img.
Inpaint Sketch:
The name itself indicates that it is a combination of the tools Sketch and Inpaint.
Yes, the name is truly meaningful.
It functions as a combination of the two aforementioned tools.
Here, you can mask any area of the uploaded image with a specific color, bringing your drawing to life on the image.
However, to use it, you should have proper painting knowledge.
But for instance, let’s explore how it works with my limited painting knowledge.
I want to add a necklace without using any text prompt.
To achieve this, I have marked the neck with a red color and clicked the generate button.
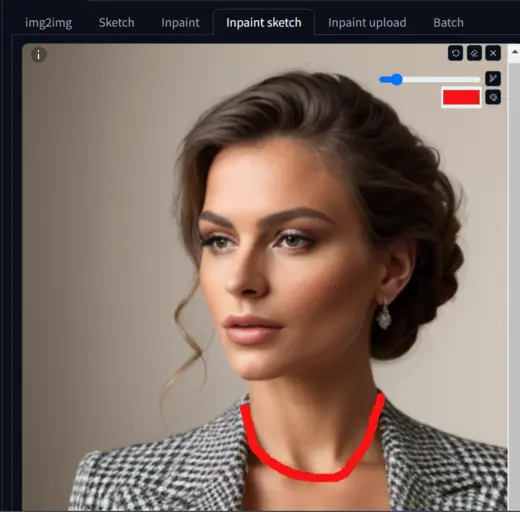

The tool truly understands my input and adds a reddish necklace.
Now, let’s proceed to the 5th section of img2img.
Inpaint Upload:
It involves masking a face with another to generate a unique face with the same composition as the previous image.
To clarify, let me first upload the images.
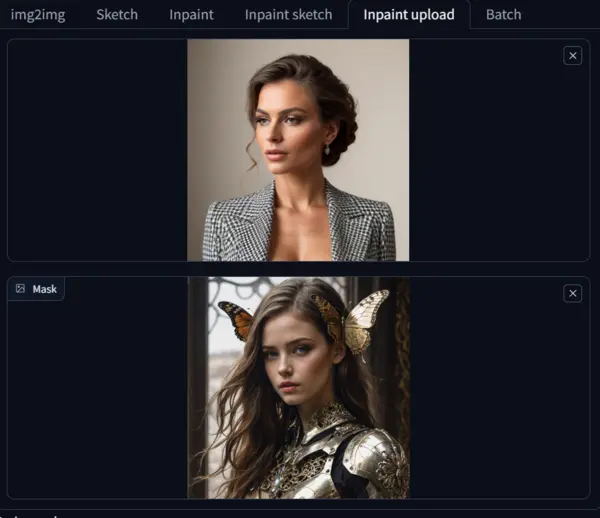
The upper canvas represents your image, with the colors and composition you wish to retain in your next generated image.
The lower canvas, i.e., the mask, is the area where you upload an image whose facial aesthetic will be added to the upper canvas image.
I hope you understand the concept.
After uploading both images, click the generate button.
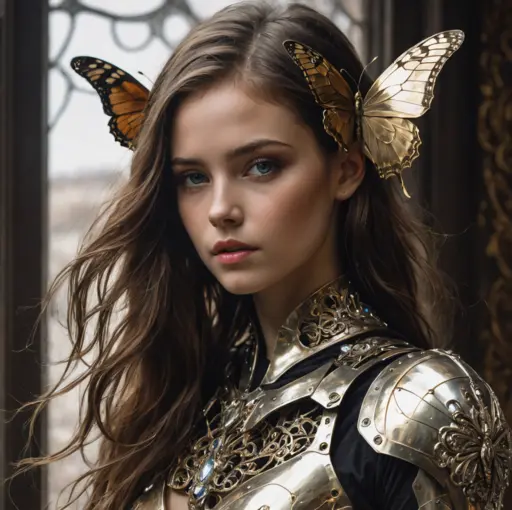
The tool will then mask the face of the lower canvas image onto the upper canvas image, creating a unique image as shown above,
Okay, these are the basic uses of the img2img tab; now let’s move to the next tab, which is Extras.
Extras tab
It is primarily used to restore faces in stable diffusion.
If you are accustomed to generating AI images, you are aware that high-quality results are not always guaranteed, even with a well-crafted prompt.
Alternatively, upscaling becomes necessary when dealing with images of very low quality.
This is where the tool comes into play.
To achieve this, simply upload the low-quality image to the Extras canvas, select an upscaling model like Codeformer, and click the generate button.
For example, I am upscaling the image below.

I have used Codeformer for upscaling, but if you want to explore the full potential of Codeformer, you may refer to our article on how to restore faces in stable diffusion.
Now, let’s move on to the next tab, PNG Info.
PNG Info:
If you come across an image on the internet that you like and wish to generate a similar one, this tool will help you discover all the information about that image.
To obtain details about an image, upload it to the PNG Info canvas, and the tool will display all the relevant information.
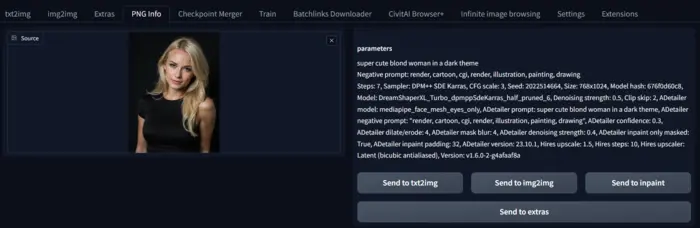
After obtaining the details, you can send the image to txt2img, img2img, Inpaint, and Extras canvas by clicking the desired button for further artwork.
Essentially, this tool works to extract prompts and parameters from images in stable diffusion.
These are the main features that we typically use, but to become a professional creator, understanding all the parameters is crucial for achieving better results.
Image Generation Parameters
In this section of the Automatic1111 guide, we’ll unravel the secrets of its parameters, empowering you to craft stunning and distinctive images.
Essential Parameters:
I should start with Prompts and Neagtive prompts, but as I discussed them earlier in the post I am starting with Steps.
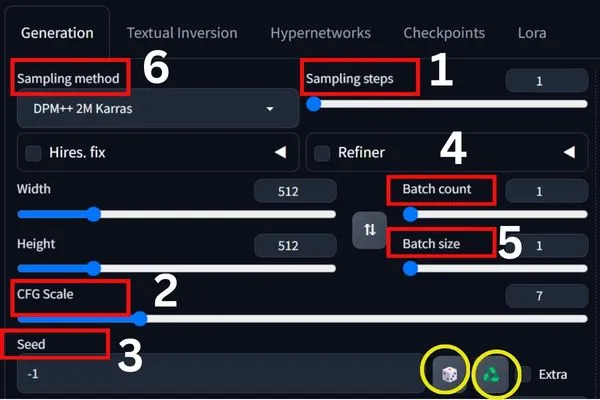
1. Sampling Steps: It controls the denoising process with the number of steps.
It varies from 0 to 150.
Higher steps (30+) yield sharper details but might require more time and GPU.
So, find the sweet spot for your creation, my recommendation is 20 to 25.
2. CFG Scale: It balances the influence of your prompt and the model’s creativity.
In short, lower values (5-7) prioritize accuracy, while higher values (8+) open doors to unexpected and artistic interpretations.
3. Seed: A random number that kickstarts your image.
If you keep the seed the same to generate images, the images will be in the same color and composition.
And changing the seed generates entirely different images, offering endless exploration possibilities.
If you want to random seed for your image make it -1, which is by default.
By clicking on the green triangle icon, as highlighted by the yellow circle in the above image, you can locate the seed of the generated image, and the white square erases the seed.
4. Batch Count: This is all about how many rounds Stable Diffusion will go through for a given text prompt.
Each round, or batch, produces one or more images, depending on the specified batch size.
5. Batch Size:
Batch size is the number of images Stable Diffusion generates simultaneously in each batch.
Think of it as how many pictures are cooked up in the same pot. If you set the batch size to 1, it’s one at a time; if you set it to 4, you get four images at once.
More VRAM (Video RAM) means you can process more images concurrently on your GPU.
Bigger batch sizes can be speedier, processing multiple images simultaneously.
Advanced Parameters: Fine-Tuning Your Masterpiece
6. Sampling Method: It dictates how the model creates images based on the provided text prompt.
Common methods include Euler, Euler-Marzouk, and Langevin.
7. Denoising Strength: In img2img mode, this parameter controls the dominance of the original image.
Lower values retain the original, while higher values (0.5+) prioritize the prompt, generating a new image inspired by the original.
Buttons Near Generate Button
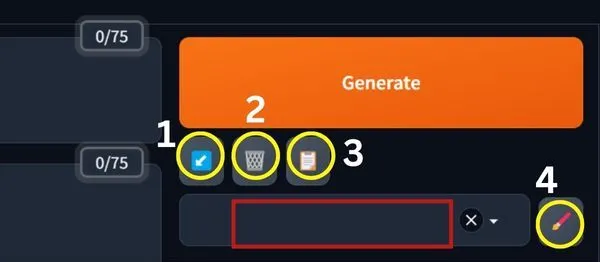
1. The Bluish button: It helps to view your last prompt.
So, it is your tool to find prompt history, but remember it only shows the previous prompt you have used.
2. Delete Button: By clicking the button you can delete your prompt.
3. Book Icon: If you have named a specific prompt, then the prompt will be saved as style.
So, when you want to add this style to the next prompt you should use it.
4. Pencil Icon: It the the tool to create a style.
If you are new then it may be difficult for you.
So, at this point, if you want to explore different styles, I recommend you use the SDXL styles selector.
Settings for Automatic1111 WebUI
As there are numerous settings in Automatic1111, I am currently addressing a specific task: adding the ‘integrate clip skip category’ to the interface. You can follow the steps below to update various settings.
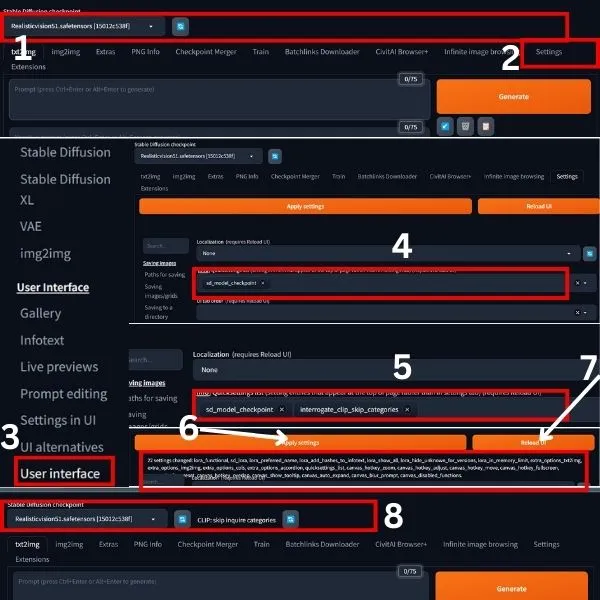
1. Upon launching A1111, observe that only one item is present in the top bar, as highlighted by 1.
2. To incorporate an additional tool, navigate to settings, scroll down the page, and locate ‘User Interface.’
3. Next, you will find only one item. To add ‘integrate clip skip category,’ enter the name in the search box and select it.
4. Now, click on ‘Apply settings,’ and you will notice a notification, as highlighted by the box under 6.
5. After viewing this, reload your UI, and the extra tool will appear in its position.
For ‘integrate clip skip category,’ it is displayed on the top bar.
Know more about Stable diffusion clip skip.
If you are interested in learning about all the settings in A1111, please let me know by commenting below and subscribing to our weekly newsletter.
I will create a post and keep you informed.
In the meantime, let’s proceed to the next part.
Installing Extensions in A1111
If you’re eager to enhance your AUTOMATIC1111 experience with additional features, installing extensions is the way to go.
The process may vary based on your operating system and personal preferences, but fear not—, we’ve got you covered.
Let’s walk through the steps to install an extension on Windows or Mac seamlessly.
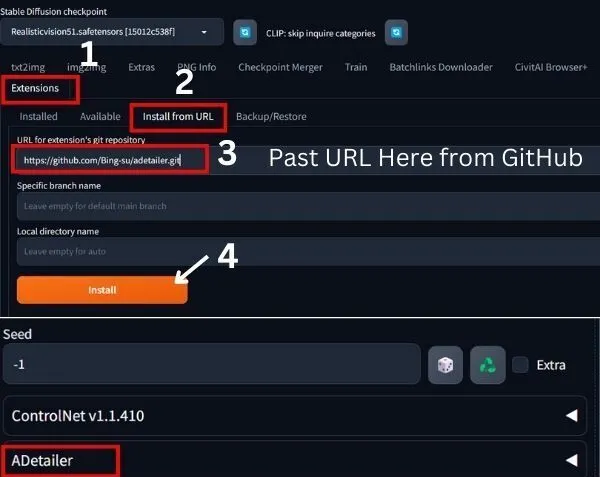
Step 1: Launch AUTOMATIC1111 Web-UI
Start by opening AUTOMATIC1111 Web-UI as you normally would. Ensure that your AUTOMATIC1111 environment is up and running smoothly.
Step 2: Navigate to the Extension Page
Once you’re in the Web UI, locate the Extension Page.
This is the hub where you’ll find a variety of extensions to enhance your AUTOMATIC1111 experience.
Step 3: Click the Install from the URL Tab
On the Extension Page, spot the “Install from URL” tab.
Click on it to initiate the installation process from a specific URL.
Step 4: Enter the Extension’s URL
In the “URL for extension’s git repository” field, enter the URL of the extension you wish to install.
This URL is typically associated with the extension’s git repository.
In my case, it is: “https://github.com/Bing-su/adetailer”
Step 5: Click the Install Button
This action signals AUTOMATIC1111 to fetch and install the extension from the specified repository.
Step 6: Wait for Confirmation
Allow AUTOMATIC1111 some time to complete the installation process.
Once the installation is successful, you’ll receive a confirmation message.
Step 7: Restart AUTOMATIC1111
To ensure the extension integrates seamlessly, restart AUTOMATIC1111.
This step finalizes the installation process, making the new features or functionalities accessible within your environment.
To find and use the newly added extension scroll down the WebUI, and notice below seed.
By following these simple steps, you can effortlessly expand the capabilities of AUTOMATIC1111 to suit your preferences.
Checkpoint Models
Stable Diffusion’s checkpoint models stand as pre-trained marvels, wielding the ability to craft images that exude a distinct style ingrained during their training.
The captivating allure of these models lies in their capacity to generate an array of styles, with each model presenting its unique artistic signature.
Now, let’s explore some noteworthy Stable Diffusion models that have left an indelible mark on the world of image generation:
1. Stable Diffusion v1.4: Made by Stability AI in August 2022, this model is like a versatile artist that can make lots of different styles of pictures.
2. Stable Diffusion v1.1: This model learned to make pictures from a bunch of examples and can create images in two sizes: 256×256 and 512×512.
It’s like having an artist with a big toolkit!
3. Stable Diffusion v1.2: Building on v1.1, this model got even better at making pretty pictures.
It is trained with lots of steps and focuses on making images look even nicer.
4. Stable Diffusion v1.5: Inspired by v1.2, this model uses special tools to make pictures, promising a mix of new and cool styles.
5. SDXL (Stable Diffusion XL): SDXL is a super-powered picture-making machine! It’s designed to turn text into images and pays extra attention to details.
It’s like a superhero artist with a big imagination!
These machines are handy for making all sorts of pictures, from real-looking people to cityscapes.
You can find more models with their details about each one on Hugging Face and CIVITAI.
For me, I’m using RealisticVision51 to generate and showcase in this post.
Final Verdict:
To sum it up, using the options I talked about in this Automatic1111 guide will help you make great images with the stable diffusion WebUI.
Since this is getting quite long, I’ll finish here for now.
But if you think I missed something important, please let me know in the comments. I’ll be happy to add it.

Hi there! I’m Zaro, the passionate mind behind aienthusiastic.com. With a background in Electronics Science, I’ve had the privilege of delving deep into AI and ML. And this blog is my platform to share my enthusiasm with you.