Ever found yourself fascinated by Stable Diffusion but frustrated by slow image generation?
Maybe your trusty GPU is struggling with this powerful AI tool.
Well, worry not!
Get ready to meet Xformers—a game-changer set to speed up your Stable Diffusion experience.

First, let’s know the reasons behind using Xformers in stable diffusion, and then find out the steps to install, enable, and make the most of this tool.
Why Need Xformers in Stable Diffusion?
Stable Diffusion can sometimes be a bit much for your GPU, pushing it to its limits.
That’s where Xformers comes in, offering a powerful boost to speed up your image creation and use your GPU more efficiently.
It’s like giving your Stable Diffusion engine a performance upgrade, allowing you to create images faster and try out bigger models without stressing your GPU.
In short, Xformers is your key to faster image creation.
So, in this guide, we’ll explore the world of Stable Diffusion Xformers, giving you the knowledge and tools to unlock its full potential.
No need for confusing tech talk—we’ll break it down for you.
Now, I hope you are excited to boost your image creation speed with Xformers.
So, let’s make the installation and setup process a breeze, ensuring you harness this powerful tool seamlessly.
How to Install Xformers in Stable Diffusion
Before we start, know that Xformers currently requires an NVIDIA GPU with Tensor Cores.
If that doesn’t match your setup, no worries! We’ll discuss alternative optimization techniques later in this post.
For Automatic1111:
If you are using a Pascal, Turing, Ampere, Lovelace, or Hopper card with Python 3.10, simply launch the repository(“https://github.com/AUTOMATIC1111/stable-diffusion-webui/wiki/Xformers“) by following on of the methods:
Method 1: Command Line Installation (For the Tech-Savvy)
1. Check Compatibility: Ensure your Stable Diffusion installation supports Xformers by running `python scripts/check_environment.py`.
If it’s compatible, you’re good to go!
2. Install Requirements: Run `pip install -r requirements.txt` to install necessary dependencies.
3. Activate Xformers: Add the `–xformers` flag to your usual Stable Diffusion command, like `python scripts/webui-user.py –xformers`.
Method 2: GUI Installation (For the User-Friendly)
It is the easiest method to go in my recommendation, so let’s see the steps:

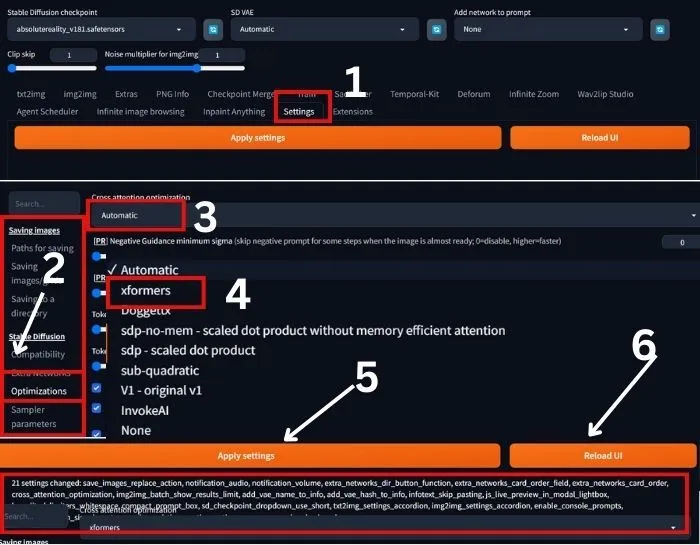
1. Launch Automatic1111 GUI: Open your Stable Diffusion web interface.
2. Go to Settings: Click the ‘settings’ from the top menu bar.
3. Enable Xformers: Find ‘optimizations’ and under “Automatic,” find the “Xformers” option and activate it.
4. Restart WebUI: Click Apply settings and wait for the confirmation notice as shown the image, then click on “Restart WebUI” for the changes to take effect.
Now, if you are using the ComfyUI, then follow one of the following methods:
Installing XFormers in ComfyUI:
Method 1: Using Conda
1. Check Compatibility: Ensure your ComfyUI installation supports XFormers by running `conda env list` and looking for “xformers” in the listed environment.
2. Install XFormers: If not present, activate your ComfyUI environment and install XFormers with `conda install xformers`.
Method 2: Manual Installation
1. Download XFormers: Visit the XFormers GitHub repository and download the suitable wheel file compatible with your Python version and operating system.
2. Place the Wheel File: Move the downloaded wheel file to your ComfyUI environment’s packages directory.
You can usually find this by running `python -m site –user-site`.
3. Install XFormers: Activate your ComfyUI environment and install the downloaded wheel file using `pip install <wheel_filename>`.
Following these simple steps, you should successfully install XFormers in your ComfyUI environment.
Troubleshooting Tips:
If errors pop up, double-check all the installation steps individually and check compatibility again.
If still it persists, seek help from online resources or community forums that can assist.
If you notice quality changes, experiment with different prompts and settings.
Keep in mind that speed might involve slight adjustments in quality.
Bonus: Optimizing Beyond Xformers:
No NVIDIA GPU with Tensor Cores?
No problem!
Explore alternative optimization techniques like reducing image resolution, adjusting batch size, and using efficient models.
Additionally, you can read our guide on the best image size for stable diffusion, use lower steps, and good models according to your needs.
But if you are okay with Xformers, then let’s dive into using Xformers effectively, exploring advanced settings, and unlocking its full potential.
How to Use Xformers in Stable Diffusion(Tips)
Now that you’ve powered up with Xformers, let’s dig deeper and explore advanced settings to fine-tune your image-generation experience.
Remember, experimenting is the game’s name, so don’t hesitate to tweak and find what works best for you.
Scheduler: Xformers offers different schedulers, each with its own speed and quality trade-offs.
Give them a try and see which suits your needs. Start with the `AUTOMATIC1111` scheduler—it’s a good starting point.
Clip Skip: This setting controls how much information is processed at each step, affecting both speed and quality.
Begin with a lower clip skip and gradually increase while monitoring the results.
For better understanding read our post on stable diffusion clip skip guide.
Monitor results closely: Pay attention to image quality and adjust settings accordingly.
Find the balance between speed and your desired quality level.
While Xformers excels in image generation, its potential goes beyond. Explore using it for:
Fine-tuning models: Train existing Stable Diffusion models for specific styles or subjects, adding a personal touch to your image creation.
If you are using SDXL, then I recommend using the SDXL styles selector.
Inpainting and editing: Try to leverage Xformers’ speed to incorporate details or edit existing images seamlessly.
Experimenting with larger models: Explore advanced Stable Diffusion models that were previously limited by memory constraints.
You can find this type of model on CIVITAI.
By understanding its magic, installing it effectively, and mastering its advanced features, you’re well on your way to generating stunning images at blazing speeds.
Now, let’s move forward and create!
Speed Test: Experience the Boost Yourself!
You’ve learned about Xformers, installed it, and delved into advanced tips to start.
Now, let’s turn theory into practice and witness how Xformers turbocharges your image generation workflow.
Various online tools let you compare Stable Diffusion performance with and without Xformers. Check out these popular options:
Hugging Face Inference API: This platform provides pre-trained Stable Diffusion models with optional Xformers support.
Run inferences both with and without Xformers to witness the speed difference.
Automatic1111 WebUI: The widely-used Stable Diffusion web interface includes a built-in benchmark tool.
so, let’s compare generation times and memory usage with and without Xformers enabled.
Prompt: “A woman with a messy haircut, off-shoulder sweater, standing, posing for a picture smiling, Masterpiece, best quality,edgQuality, photorealistic, hyper-realistic, edgtb_woman,edgtb_face,edgtb_body.”
Negative Prompt: “Low quality, bad quality, blurry, cartoon, anime, bad anatomy.”
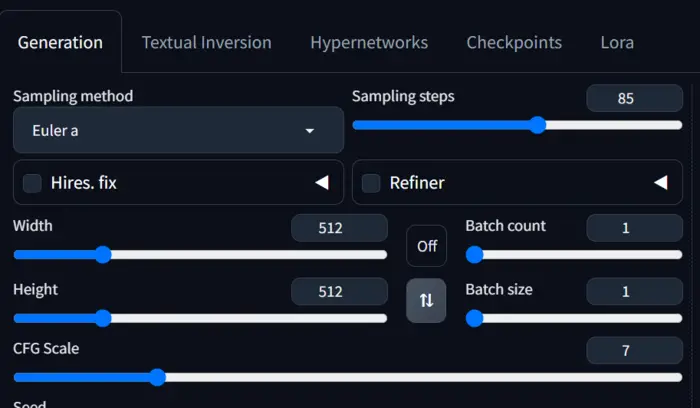
I have attached the screenshot of the general settings below:

You can I have set the Sampling steps at 85. This means the model takes 85 steps to complete the generation.
My machine features 16GB RAM and 16GB VRAM.
The results are:


The image generation process with Xformers takes 15 seconds and without it takes 24 seconds.
The image quality also betters. Right!
Yes, if you’re considering using Xformers to enhance your stable diffusion, the answer is affirmative.
Explore online resources comparing image quality generated with and without Xformers for the same prompt.
This gives you a real-world sense of the trade-off between speed and quality.
But before leaving, as a user, you may have some questions:
No, Xformers currently requires an NVIDIA GPU with Tensor Cores. Other GPUs and CPUs won’t experience the full-speed benefits.
Not necessarily. While it speeds up generation, there might be subtle quality changes, especially for complex prompts or styles. Experiment to find the right balance for your needs.
Speed gains depend on your hardware, model size, and settings. Expect significant improvements on compatible GPUs, especially with larger models and higher resolutions.
Conclusion:
In conclusion, Xformers is not just a speed boost; it’s a gateway to new creative possibilities.
So, experiment with larger models, delve into fine-tuning, and push the boundaries of your imagination.
As you embark on your creative journey with Xformers, may your images be stunning, your ideas boundless, and your inspiration ever-flowing.
Remember, the ultimate power lies not in the tool itself, but in the creative mind that wields it.
So, go forth, create, and leave your mark on the world!

Hi there! I’m Zaro, the passionate mind behind aienthusiastic.com. With a background in Electronics Science, I’ve had the privilege of delving deep into AI and ML. And this blog is my platform to share my enthusiasm with you.


